If you’ve ever craved that perfectly fluffy, melt-in-your-mouth marshmallow but wanted to avoid all the weird additives, I’ve got just the thing! This Homemade Maple Marshmallows Recipe swaps out corn syrup for pure maple syrup, making it a wholesome treat you can feel good about.

Jump to:
Why You'll Love This Recipe
I’ve made marshmallows from scratch a few times now, and honestly, there’s something so satisfying about whipping up these fluffy clouds at home—especially knowing exactly what’s inside. Plus, the subtle maple flavor from real syrup adds a warm, cozy touch that’s hard to find in store-bought versions.
- No Corn Syrup: Uses natural maple syrup for sweetness and flavor, skipping artificial ingredients.
- Pure Ingredients: Gelatin and collagen create the perfect texture with clean-label goodness.
- Simple Prep: No cooking complicated sugar syrups—this is an easy, no-cook method that anyone can try.
- Perfect for Gifting: These marshmallows make a thoughtful homemade gift or a festive treat for winter gatherings.
Ingredients & Why They Work
Before diving in, a quick heads-up: these ingredients are pretty straightforward, but quality matters. I always reach for grass-fed gelatin and pure maple syrup when available to keep these marshmallows wholesome and delicious.

- Water: Divided to help bloom the gelatin and gently heat the maple syrup mixture.
- Gelatin Powder: The star that gives marshmallows their classic bounce and fluff.
- Collagen Powder: Optional but adds an extra boost of protein and firmness.
- Pure Maple Syrup: Natural sweetener with a rich, warm flavor that replaces corn syrup.
- Vanilla Bean Paste: Adds aromatic vanilla notes and flecks that elevate the marshmallow flavor.
- Tapioca Flour: Combined with powdered sugar, it keeps the marshmallows from sticking.
- Powdered Sugar: Lightly coats the marshmallows for that classic texture and sweetness.
Make It Your Way
One of the best things about this Homemade Maple Marshmallows Recipe is how easy it is to tailor it to your tastes or dietary needs. Whether you want to amp up the maple flavor or add a bit of texture, you can make these marshmallows truly your own!
- Vegan Variation: While this recipe uses gelatin and collagen, you can experiment with agar-agar as a plant-based substitute, though the texture may differ slightly from traditional marshmallows.
- Flavor Twists: Try stirring in a pinch of cinnamon or cardamom for a warming spice note, or sprinkle in finely chopped nuts for a delightful crunch. I once added a hint of espresso powder for a subtle mocha flavor—delicious!
- Shape and Size: Instead of the classic square cubes, try using cookie cutters to make fun shapes for holidays or special occasions.
- Extra Fluffiness: For an even lighter texture, you can whip the mixture a little longer—but be careful not to overdo it or the marshmallows might get grainy.
Step-by-Step: How I Make Homemade Maple Marshmallows Recipe

Step 1: Mix the Sweet and Powdered Coating
Start by combining the powdered sugar and tapioca flour in a bowl. This mixture is essential—not just for dusting your marshmallows to keep them from sticking, but also for giving that classic marshmallow texture. Set it aside; we’ll use it a few times throughout the process.
Step 2: Prepare Your Baking Dish
Line an 8x8 baking dish with parchment paper, and generously dust the bottom and sides with the powdered sugar and tapioca mixture. This extra step ensures your marshmallows release cleanly and keep their perfect shape once set.
Step 3: Bloom the Gelatin
Pour ½ cup of water into a large bowl. Evenly sprinkle the gelatin powder over the surface and let it sit for a few minutes. This “blooming” process is key—it hydrates the gelatin so it dissolves smoothly later. You’ll notice it thickening into a soft paste—that’s exactly what you want!
Step 4: Gently Heat the Maple Syrup Mixture
In a small saucepan, combine the remaining ½ cup of water with ½ cup pure maple syrup. Warm this on low heat, carefully bringing it to a gentle simmer over about 5 minutes. Be patient—you want it hot, but absolutely avoid boiling, which could alter the texture and flavor.
Step 5: Whisk Gelatin and Collagen Together
Using a stand mixer, whisk the bloomed gelatin along with the optional collagen powder on low speed for about one minute. This forms a thick, elastic paste that's the base for your marshamallow fluff.
Step 6: Combine and Whip to Fluffy Perfection
Slowly pour your warm maple syrup mixture into the gelatin paste while the mixer runs at low speed. Add in the luscious vanilla bean paste for that sweet, aromatic boost. Then, crank the mixer up to high and whip for 6 to 7 minutes. The mixture will thicken and transform into a glossy, cloud-like marshmallow cream. Here’s a pro tip: stop whipping just as it thickens—overmixing can cause a grainy texture you want to avoid.
Step 7: Pour and Chill
Quickly pour your fluffy marshmallow mixture into the prepared baking dish, spreading it evenly with a spatula. Immediately dust the top with more of your powdered sugar and tapioca flour mixture to lock in texture and keep it from sticking. Then, pop it into the fridge for at least 4 hours—or overnight if you can wait—to let it set beautifully.
Step 8: Cut and Enjoy Your Homemade Treats
Once chilled and firm, dust the surface with a little more of the powdered sugar coating, then carefully cut into 12 equal cubes. These marshmallows are now ready to delight—perfect for toasting over a fire, melting into your coffee, or simply enjoying by the handful!
Top Tip
These tips will help you achieve the perfect texture and flavor for your Homemade Maple Marshmallows Recipe, ensuring they turn out fluffy, delicious, and easy to handle every time.
- Gentle Heating: When warming the maple syrup and water, keep the heat low and avoid boiling. This preserves the natural sweetness and prevents crystallization, leading to a smooth marshmallow base.
- Timing is Everything: Pour the fluffy marshmallow mixture into your prepared dish quickly after whipping. Waiting too long can cause it to set unevenly or become difficult to spread.
- Whipping Watch: Beat the gelatin and syrup mixture just until thick and fluffy—about 6-7 minutes. Over-whipping can cause graininess, so trust your mixer and keep an eye on texture.
- Coating Care: Don’t skip dusting your baking dish and marshmallow surface generously with the powdered sugar and tapioca flour mix. It’s key to prevent sticking and gives that classic marshmallow feel.
How to Serve Homemade Maple Marshmallows Recipe

Garnishes
Elevate your marshmallows by adding a light dusting of cinnamon or cocoa powder for a twist. Rolled lightly in crushed toasted nuts or coconut flakes can add delightful texture and a hint of extra flavor that's perfect for festive occasions.
Side Dishes
Serve your Homemade Maple Marshmallows alongside warm hot chocolate or a creamy latte to complement their sweet, maple-infused flavor. They’re also fantastic melted atop brownies, fudge, or roasted sweet potatoes for a cozy treat.
Make Ahead and Storage
Storing Leftovers
Store your marshmallows in an airtight container at room temperature. They will keep their softness and flavor for up to 1 week—perfect for enjoying over several days or sharing as sweet gifts.
Freezing
If you want to keep your Homemade Maple Marshmallows Recipe longer, you can freeze them. Wrap each marshmallow cube individually in parchment paper, then place them in a freezer-safe airtight container. They’ll keep well for up to 2 months. Thaw at room temperature before serving.
Reheating
For toasting, simply skewer and hold over a low flame or grill until golden and melty. If warming for a dessert topping, gentle microwave bursts of 5-10 seconds work well—watch closely so they don’t melt completely.
Frequently Asked Questions:
Since gelatin is animal-derived, this homemade marshmallow recipe is not vegan. However, you could experiment with agar-agar or other plant-based gelling agents, but texture and results will differ.
Tapioca flour combined with powdered sugar prevents the marshmallows from sticking, providing that classic fluffy, non-sticky exterior. It is also gluten free, making it ideal for this recipe.
You can substitute honey, but it will alter the flavor profile and sweetness of the marshmallows. Maple syrup adds a unique natural sweetness and depth that complements the vanilla bean beautifully.
Avoid over-whipping the mixture after adding the warm syrup. Once it reaches a fluffy, thick consistency, stop mixing to maintain smooth texture.
Final Thoughts
Making your own Homemade Maple Marshmallows Recipe is such a rewarding experience. You get to enjoy a soft, naturally sweet treat without any corn syrup or artificial ingredients. Whether toasted by the fire or nestled atop your favorite drink or dessert, these marshmallows offer a warm, cozy touch that’s perfect for sharing with family and friends. I hope this recipe brings a little extra sweetness and joy to your kitchen!
Print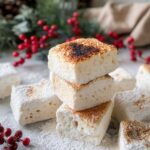
Homemade Maple Marshmallows Recipe
- Prep Time: 15 minutes
- Refrigeration Time: 4 hours
- Cook Time: 0 minutes
- Total Time: 4 hours 15 minutes
- Yield: 12 marshmallows
- Category: Dessert
- Method: No-Cook
- Cuisine: American
- Diet: Gluten Free
Description
Delight in homemade marshmallows crafted without corn syrup, using natural ingredients like gelatin, collagen, pure maple syrup, and vanilla bean paste. These fluffy treats are perfect for toasting or adding to your favorite desserts, offering a wholesome alternative to store-bought marshmallows.
Ingredients
Marshmallow Base
- 1 cup water (divided)
- 3 tablespoon gelatin powder (I used Great Lakes Wellness)
- ¼ cup collagen powder (optional)
- ½ cup pure maple syrup
- 1 tablespoon vanilla bean paste
Coating
- ¼ cup tapioca flour
- ½ cup powdered sugar
Instructions
- Prepare Coating Mix: Combine powdered sugar and tapioca flour in a bowl and set aside for later use.
- Prepare Baking Dish: Line an 8x8 baking dish with parchment paper and dust the bottom and sides generously with the powdered sugar and tapioca mixture to prevent sticking.
- Bloom Gelatin: In a large bowl, add ½ cup water. Sprinkle the gelatin powder evenly over the surface and let it sit for a few minutes to absorb the water and thicken.
- Heat Maple Syrup Mixture: In a small saucepan, combine the remaining ½ cup water and ½ cup pure maple syrup. Heat gently on low heat for about 5 minutes or until it starts to simmer; do not boil.
- Mix Gelatin and Collagen: Using a stand mixer, whisk the gelatin mixture along with the collagen powder on low speed for 1 minute until it forms a thick paste.
- Combine and Whip: Gradually pour the warm maple syrup mixture into the gelatin paste while continuing to mix. Add the vanilla bean paste. Increase the mixer speed to high and beat the mixture for 6-7 minutes until it thickens and becomes a fluffy marshmallow cream. Be careful not to overmix.
- Set Marshmallows: Quickly pour the marshmallow mixture into the prepared baking dish. Spread it evenly using a spatula and dust the surface with more of the powdered sugar and tapioca mixture.
- Chill: Refrigerate the marshmallows for 4 hours or preferably overnight to set completely.
- Cut and Serve: Once set, dust the top with the powdered sugar mix, cut the marshmallows into 12 equal cubes, and enjoy your homemade treat.
Notes
- Use grass-fed gelatin and collagen for a guilt-free, wholesome version.
- The tapioca flour and powdered sugar coating prevents sticking and helps achieve the classic marshmallow texture.
- Be careful not to over-whip the marshmallow mixture as it could become grainy.
- These marshmallows can be toasted just like store-bought ones and make a perfect holiday treat.
- Store marshmallows in an airtight container at room temperature for up to 1 week.
Nutrition
- Serving Size: 1 marshmallow
- Calories: 70 kcal
- Sugar: 9 g
- Sodium: 5 mg
- Fat: 0.1 g
- Saturated Fat: 0 g
- Unsaturated Fat: 0 g
- Trans Fat: 0 g
- Carbohydrates: 11 g
- Fiber: 0 g
- Protein: 1 g
- Cholesterol: 0 mg


Leave a Reply