If you’re craving a dessert that’s creamy, naturally sweet, and totally fuss-free, then this Creamy Vanilla Bean Cottage Cheese Cheesecake Recipe is about to become your new favorite. Imagine spooning into luscious jars filled with silky vanilla-infused filling layered over a nutty date crust—without ever turning on the oven!

Jump to:
- Why You'll Love This Recipe
- Ingredients & Why They Work
- Make It Your Way
- Step-by-Step: How I Make Creamy Vanilla Bean Cottage Cheese Cheesecake Recipe
- Top Tip
- How to Serve Creamy Vanilla Bean Cottage Cheese Cheesecake Recipe
- Make Ahead and Storage
- Frequently Asked Questions:
- Final Thoughts
- Creamy Vanilla Bean Cottage Cheese Cheesecake Recipe
Why You'll Love This Recipe
I’ve made these no-bake vanilla bean cheesecake jars more times than I can count—and each time, I’m amazed by how effortlessly creamy yet light they turn out. Whether you’re after a quick breakfast boost or a guilt-free dessert, these jars deliver on both flavor and convenience.
- Wholesome Ingredients: Uses cottage cheese and Greek yogurt for a protein-packed, low-fat treat.
- No Baking Required: Ready in just 15 minutes plus chilling, perfect for busy days.
- Natural Sweetness: Maple syrup and medjool dates provide rich, natural flavor without refined sugars.
- Elegant Presentation: Served in jars for a fun, portable dessert or breakfast option.
Ingredients & Why They Work
When you shop for this recipe, pick fresh, quality ingredients to keep it wholesome and vibrant. The magic really happens when the creamy vanilla filling meets the naturally sweet crust—each component thoughtfully chosen to complement the other.

- Cottage Cheese: I prefer Good Culture low fat 2% for its smooth texture and mild flavor that blends beautifully in the filling.
- Greek Yogurt: Adds tanginess and creaminess while boosting protein content.
- Maple Syrup: A natural sweetener that balances the tartness and brings warmth.
- Vanilla Bean Paste: Infuses the cheesecake with real vanilla specks and rich aroma, making it extra special.
- Medjool Dates: Perfectly sticky and sweet, these form the natural base for the crust.
- Hazelnuts: Add crunch and a cozy, nutty flavor that pairs wonderfully with the vanilla.
- Heavy Cream: Whipped to soft peaks, it tops the jars with airy richness and smooth vanilla notes.
Make It Your Way
The beauty of this Creamy Vanilla Bean Cottage Cheese Cheesecake Recipe is how easily it adapts to your taste and dietary needs. Feel free to experiment with different nuts or sweeteners, or add fresh berries on top for a burst of color and flavor.
- Variation: For a nut-free version, I swap out the hazelnuts for sunflower seeds – it still gives that lovely crunch without sacrificing the natural sweetness from the dates.
- Seasonal twist: Adding a sprinkle of cinnamon or a handful of crushed ginger snaps into the crust creates a cozy, warming note perfect for fall and winter.
- Flavor swap: Sometimes, I like to replace vanilla bean paste with almond extract for an entirely different yet equally delicious cheesecake experience.
- Lighter version: Using low-fat cottage cheese and yogurt keeps this dessert light, but for an ultra-rich indulgence, full-fat cream and dairy are the way to go.
Step-by-Step: How I Make Creamy Vanilla Bean Cottage Cheese Cheesecake Recipe

Step 1: Create the Perfect Crust
Start by placing ½ cup of pitted medjool dates and ½ cup of hazelnuts into your food processor. Pulse in short bursts until the mixture resembles a sticky, coarse crumb — it should hold together when pressed but still have a bit of texture. Press this crust evenly into the bottoms of six 4-ounce jars. This natural, no-bake base gives a perfect balance of sweetness and crunch without any added sugar or butter.
Step 2: Whip Up the Creamy Filling
In a blender or food processor, combine 1 cup cottage cheese, ¾ cup plain Greek yogurt, ¼ cup maple syrup, and 1 tablespoon vanilla bean paste. Blend until the mixture is completely smooth and creamy—no lumps in sight! This blending step is key to achieving the luscious texture that makes this cheesecake so dreamy.
Step 3: Assemble Your Cheesecake Jars
Gently spoon the creamy filling over the date and hazelnut crust in each jar, smoothing the tops with a spatula for a neat finishing touch. This layering not only looks beautiful but also lets each bite include that wonderful crunch followed by silky creaminess.
Step 4: Whip and Add the Dreamy Topping
Chill a mixing bowl before pouring in 1 cup of heavy cream and 1 tablespoon vanilla bean paste. Whip the cream until soft peaks form—light, fluffy, and fragrant with vanilla. Spoon a generous layer of this whipped cream on top of the filling in each jar, creating a luscious finishing layer that’s simply irresistible.
Step 5: Chill and Serve
Seal the jars with lids or covers and refrigerate for at least 5 hours. This chilling time lets all the flavors meld beautifully and ensures the cheesecake sets perfectly. When ready, serve chilled for a refreshing, creamy treat anytime—whether as breakfast, a snack, or dessert.
Top Tip
These little jars pack a lot of flavor, and a few insider tricks will help you get that perfect creamy texture and balanced sweetness every time.
- Smooth Filling: Blending the cottage cheese and Greek yogurt until completely smooth is key — I usually blitz mine for about 1-2 minutes to avoid any lumps. It really gives this Creamy Vanilla Bean Cottage Cheese Cheesecake Recipe that luxurious texture.
- Press the Crust Firmly: When pressing the medjool date and hazelnut crust into the jars, pack it down firmly but gently. This creates a solid base that holds up well under the creamy filling without crumbling when you dig in.
- Chill Time Patience: Don’t rush the 5-hour chilling step. It’s during this time the flavors meld beautifully and the cheesecake sets just right. Overnight in the fridge is even better if you can wait!
- Whip Cream Consistency: Whip the heavy cream to soft peaks — if you over-whip, it can become grainy and tough to spread. That fluffy topping is what turns this into a real treat.
How to Serve Creamy Vanilla Bean Cottage Cheese Cheesecake Recipe

Garnishes
Adding a fresh garnish elevates each jar beautifully. Try a sprinkle of toasted hazelnuts for crunch, a few fresh berries like raspberries or blueberries for a pop of color and tartness, or even a light dusting of cinnamon or nutmeg for warmth. A tiny drizzle of extra maple syrup on top never hurts if you like it sweeter!
Side Dishes
This no bake cheesecake is lovely on its own, but it pairs wonderfully with a cup of freshly brewed coffee or herbal tea for a cozy breakfast or dessert combo. For a brunch spread, serve alongside fresh fruit salads, whole-grain toast with nut butter, or lightly toasted granola to complement the creamy jars.
Make Ahead and Storage
Storing Leftovers
Keep any leftover jars sealed tightly with their lids or plastic wrap in the refrigerator. They’ll stay fresh and creamy for up to 3 days — perfect for quick breakfasts or healthy snacks throughout the week.
Freezing
Because of the fresh dairy and whipped cream topping, freezing isn’t ideal for this cheesecake recipe. The texture of the filling and cream can become grainy or separate upon thawing. For the best experience, enjoy these jars fresh or chilled!
Reheating
This cheesecake is meant to be served cold and refreshing, so no reheating is needed. Just let it sit for a few minutes at room temperature if it’s straight from a very cold fridge before digging in to unlock the full flavor and creamy texture.
Frequently Asked Questions:
Yes! You can substitute vanilla bean paste with pure vanilla extract in the filling and topping. Just keep in mind you won’t get those lovely specks of vanilla bean, and the texture might be slightly less rich, but the flavor will still be delicious.
Absolutely. Using Good Culture low fat 2% cottage cheese and plain Greek yogurt keeps this dessert light and lower in fat. You can also adjust by using low-fat heavy cream substitutes, but whole heavy cream provides the creamiest topping.
Yes. To make a nut-free crust, swap the hazelnuts for sunflower seeds or simply use extra medjool dates to hold the crust together. The texture and flavor will be slightly different but still tasty and wholesome.
Chilling for at least 5 hours is essential for the cheesecake to set and let the flavors meld. If you have time, overnight chilling enhances the texture further and makes the dessert even more luscious.
Final Thoughts
There’s something truly special about these Creamy Vanilla Bean Cottage Cheese Cheesecake Jars — they feel indulgent without being heavy, come together in no time, and are bursting with wholesome flavor. Whether you’re looking for a quick breakfast treat or a light dessert, this recipe brings comfort and joy in every spoonful. I hope you enjoy making and sharing this delightful no-bake cheesecake as much as I do!
Print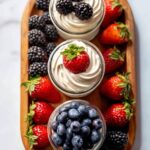
Creamy Vanilla Bean Cottage Cheese Cheesecake Recipe
- Prep Time: 10 minutes
- Chilling Time: 5 hours
- Cook Time: 5 minutes
- Total Time: 15 minutes
- Yield: 6 servings
- Category: Dessert
- Method: No-Cook
- Cuisine: American
- Diet: Low Fat
Description
Delight in these No Bake Vanilla Bean Cheesecake Jars made with wholesome cottage cheese and Greek yogurt, sweetened naturally with maple syrup and enriched with the warm aroma of vanilla bean paste. This creamy, light dessert or breakfast option features a medjool date and hazelnut base, layered with a luscious vanilla-infused cream topping, all prepared quickly without baking.
Ingredients
Filling
- 1 cup cottage cheese (Good Culture low fat 2%)
- ¾ cup plain Greek yogurt
- ¼ cup maple syrup
- 1 tablespoon vanilla bean paste
Crust
- ½ cup medjool dates (pit removed)
- ½ cup hazelnuts
Topping
- 1 cup heavy cream
- 1 tablespoon vanilla bean paste
Instructions
- Prepare the Crust: Place the medjool dates and hazelnuts in a food processor. Pulse until the mixture forms a sticky, coarse crumb resembling a crust base consistency. Press the crust mixture evenly into the bottoms of six 4-ounce jars to form a firm base.
- Make the Filling: In a blender or food processor, combine cottage cheese, Greek yogurt, maple syrup, and 1 tablespoon of vanilla bean paste. Blend until the mixture is smooth and creamy with no lumps.
- Assemble the Jars: Spoon the creamy filling evenly over the prepared date and hazelnut crust in each jar. Smooth the tops gently with a spatula.
- Prepare the Topping: In a chilled bowl, whip the heavy cream with 1 tablespoon of vanilla bean paste until soft peaks form, ensuring a light and fluffy consistency.
- Top and Chill: Add a generous layer of the vanilla whipped cream on top of the filling in each jar. Seal the jars with lids or covers and refrigerate for at least 5 hours to allow the flavors to meld and the cheesecake to set.
- Serve: Remove from the refrigerator and enjoy these creamy, flavorful no-bake cheesecake jars chilled for a refreshing treat anytime.
Notes
- The dates and hazelnuts create a naturally sweet and crunchy crust base without the need for added sugars or butter.
- For a nut-free version, substitute hazelnuts with sunflower seeds or omit entirely and use extra dates.
- Vanilla bean paste provides a rich vanilla flavor and delightful specks; pure vanilla extract can be used as a substitute but will alter the texture slightly.
- Chilling the jars for at least 5 hours or overnight enhances the texture and flavor combination.
- Use full-fat dairy for a richer, creamier result or low-fat for a lighter dessert.
Nutrition
- Serving Size: 1 jar (about 4 oz)
- Calories: 280 kcal
- Sugar: 14 g
- Sodium: 120 mg
- Fat: 18 g
- Saturated Fat: 9 g
- Unsaturated Fat: 7 g
- Trans Fat: 0 g
- Carbohydrates: 20 g
- Fiber: 3 g
- Protein: 9 g
- Cholesterol: 60 mg


Leave a Reply