There’s something utterly charming about these cute little treats, and that’s exactly what makes the Chocolate Mushroom Sugar Cookies Recipe so special. With their rich chocolatey exterior and whimsical mushroom design, they’re not only a delight to eat but a joy to bake and share with friends!

Jump to:
Why You'll Love This Recipe
I honestly can’t stop recommending this recipe because it’s a personal favorite for so many reasons. It’s got that perfect slice-and-bake magic, so you can prep ahead and bake fresh cookies whenever you need a sweet pick-me-up. Plus, who wouldn’t fall for those adorable mushroom tops dusted with powdered sugar?
- Easy slice-and-bake format: Make the dough in advance and bake as many or as few cookies as you want, whenever you want.
- Delightfully soft texture: These cookies come out thick, tender, and melt-in-your-mouth – it’s pure comfort in every bite.
- Whimsical mushroom design: It’s such a fun, photo-worthy cookie that’s perfect for gifting or holiday baking.
- Chocolate meets classic sugar cookie: The subtle cocoa adds depth without overwhelming the vanilla sweetness.
Ingredients & Why They Work
Every ingredient in this recipe plays a crucial role to give you cookies that hold their shape, have that tender crumb, and a subtle chocolate kick. Here’s a quick rundown of why I love each one and what to keep in mind when you shop for them.

- Butter: Using butter that's barely softened—not too soft or melted—helps your cookies hold their shape and ensures a tender crumb.
- Granulated sugar: It adds sweetness and a little crunch, especially in the coarse sugar sprinkling.
- Salt: It’s essential to balance the sweetness and deepen the flavor.
- Vanilla extract: Pure vanilla adds warmth and a wonderful aroma that shines through the chocolate and sugar cookie base.
- Egg: The glue that holds everything together, plus it enriches the dough’s texture.
- All-purpose flour: Gives structure but is light enough to keep the cookies soft and tender.
- Dutch processed cocoa powder: This cocoa lends a smooth, mellow chocolate flavor without bitterness.
- Red gel food coloring: Needed to create that classic bright mushroom cap color without diluting the dough.
- White round pearl sprinkles: These little pearls are the perfect whimsical dots on the mushroom mushrooms.
- Coarse sugar: Sprinkled for sparkle and a touch of crunch on the mushroom caps.
- Powdered sugar: For dusting, it gives that snowy, fairy-tale look perfect for mushroom tops.
- Heavy whipping cream: Just a bit to make the powdered sugar dusting stick beautifully.
- Green gel food coloring: For painting tiny stems or leaves to enhance the mushroom look if you like extra detail.
Make It Your Way
I like mixing things up with this Chocolate Mushroom Sugar Cookies Recipe depending on the occasion. It’s a blank canvas that’s easy to personalize, so feel free to play with the colors or add your own favorite spices to the dough.
- Variation: Sometimes I swap out the cocoa powder for cinnamon and a bit of nutmeg to make “autumn mushroom” cookies, which adds a cozy warmth perfect for cooler days.
- Diet-friendly tweaks: For a gluten-free twist, I’ve tried using a cup of almond flour mixed with gluten-free all-purpose flour, which worked surprisingly well – just expect a slightly different texture.
- Colorful caps: Don’t hesitate to experiment with different gel food colors beyond classic red, like pastel pinks or purples for a whimsical party treat.
Step-by-Step: How I Make Chocolate Mushroom Sugar Cookies Recipe

Step 1: Cream the Butter and Sugar
Start by beating the butter and granulated sugar until creamy but not melted – it should still have a bit of body, like a soft paste. This stage is key to getting that tender yet thick texture. I usually use room temperature ingredients to make this easier, but be careful not to over-soften your butter. It’s about finding that sweet spot!
Step 2: Mix in the Egg, Vanilla, and Salt
Next, add the egg and vanilla extract into your creamed butter mixture, along with a pinch of salt. Mix until everything is evenly combined. This binds the dough and infuses it with flavor, so don’t skip the vanilla – it really lifts the chocolate notes nicely.
Step 3: Combine the Dry Ingredients
In a separate bowl, sift together your flour and Dutch-processed cocoa powder. Sifting helps avoid any lumps and makes your dough smoother. Gently fold these dry ingredients into your wet ingredients until just combined – don’t overmix or the cookies may turn out tough instead of tender.
Step 4: Create the Mushroom Caps and Design
This is the really fun part! Divide your dough and knead in red gel food coloring to color the mushroom caps. Roll little balls of this red dough and add tiny white pearl sprinkles to mimic the classic mushroom spots. Then assemble your mushroom shape slices with the chocolate dough acting as the background. Don’t worry if it’s not perfect — they look adorably rustic when hand-shaped.
Step 5: Chill the Dough and Slice
Wrap your dough log in plastic wrap and chill for at least an hour (I sometimes overnight it). This step’s a game-changer because cold dough slices cleanly without crumbling and helps maintain the charming mushroom shape during baking.
Step 6: Bake and Finish
Slice the chilled dough about ⅓ inch thick and place on a parchment-lined baking sheet. Bake at 350°F (175°C) for 10 minutes or until the edges are just set. While still warm, dust the mushroom caps lightly with powdered sugar mixed with a little heavy cream to get that velvety look — it’s such a nice finishing touch!
Top Tip
Having made this recipe several times, I’ve realized these small tips can truly elevate your results — they make the difference between good cookies and unforgettable ones!
- Butter Softening: Don’t rush softening the butter. It should be pliable, not melty. I sometimes pop it in the microwave for just 5-second bursts to get it perfect.
- Dough Chilling: Always chill your dough well before slicing — this helps maintain clean cuts and that perfect mushroom form during baking.
- Food Coloring: Use gel food coloring instead of liquid to avoid changing the dough’s texture or moisture balance.
- Powdered Sugar Dusting: Mix powdered sugar with a splash of heavy cream for a dust that clings beautifully to warm mushroom caps.
How to Serve Chocolate Mushroom Sugar Cookies Recipe

Garnishes
I love finishing off these mushroom cookies with a gentle powdered sugar dusting like snow on the caps. Sometimes I also add a light brush of green gel food coloring on the “stems” to give them a bit more character — it’s subtle but makes a lovely difference, especially for holiday trays.
Side Dishes
Pair your cookies with a cozy cup of chai tea or a creamy hot chocolate. These drinks complement the soft chocolate flavor beautifully and turn an afternoon bite into a full cozy ritual.
Creative Ways to Present
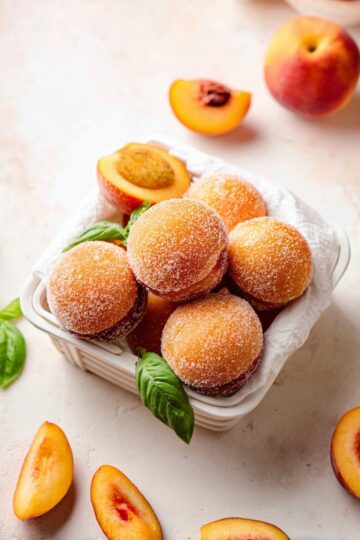
For parties, I like to arrange these mushroom cookies on a wooden board with fresh moss or edible flowers around them to lean into the cottagecore vibe. They also look adorable tied in small packages with twine and a sprig of rosemary as gifts — rustic and charming!
Make Ahead and Storage
Storing Leftovers
Once cooled, I store leftover cookies in an airtight container at room temperature, layering them between parchment paper so they don’t stick. They stay soft and fresh for up to a week, though they rarely last that long around here!
Freezing
I’m a big fan of freezing the cookie dough logs before slicing. Wrapped well in plastic and foil, they keep in the freezer for up to 3 months. When you’re ready, just slice and bake fresh – it’s a game-changer for last-minute baking.
Reheating
If you want to refresh your cookies after storing, a quick 5-10 second zap in the microwave or warming for a few minutes in a low oven brings back that freshly baked softness – just watch closely so they don’t dry out!
Frequently Asked Questions:
Yes, but Dutch-processed cocoa has a milder, less acidic flavor which complements these cookies without bitterness. If you use regular cocoa, your cookies might taste a bit more intense, but still delicious.
Chilling the dough well before slicing and baking is key. Also, use gel food coloring to avoid adding moisture that could blur the design. Slice the dough about one-third inch thick for best results.
You can try substituting vegan butter and a flax or chia egg for the regular egg. Be aware this might change the texture slightly. Using dairy-free cream for dusting also works well.
At least one hour, but overnight chilling is best. This helps the dough firm up for clean slicing and better mushroom shapes during baking.
Final Thoughts
This Chocolate Mushroom Sugar Cookies Recipe holds a special place in my baking lineup because it turns simple ingredients into something genuinely whimsical and unforgettable. From the satisfying process of shaping the mushrooms to the joy of biting into that soft, chocolaty cookie, it’s a recipe I always recommend sharing with friends and family. Give it a try—you’ll end up with a batch of charming treats that taste as delightful as they look.
Print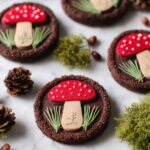
Chocolate Mushroom Sugar Cookies Recipe
- Prep Time: 20 minutes
- Cook Time: 10 minutes
- Total Time: 1 hour 30 minutes
- Yield: 18 cookies
- Category: Dessert
- Method: Baking
- Cuisine: American
- Diet: Vegetarian
Description
These Mushroom Sugar Cookies are thick, soft slice-and-bake cookies featuring a chocolate outside and an adorable mushroom design in the center. Easy and convenient to make, they are perfect for a cute cottagecore or holiday-themed treat.
Ingredients
Cookie Dough
- ¾ cup butter (barely softened - not too soft!)
- ¾ cup granulated sugar
- ¼ teaspoon salt
- 1 teaspoon vanilla
- 1 large egg (room temperature)
- 2 cups all purpose flour (240g)
- 2 tablespoons cocoa powder (dutch processed)
Decorations
- Red gel food coloring (as needed)
- White round pearl sprinkles
- ⅓ cup coarse sugar
- ½ cup powdered sugar
- 1-2 tablespoons heavy whipping cream
- Green gel food coloring (as needed)
Instructions
- Prepare the Dough: Cream together the butter and granulated sugar until light and fluffy. Add the salt, vanilla, and egg, mixing until combined. Gradually mix in the all-purpose flour and cocoa powder until a smooth dough forms.
- Shape the Cookies: Roll out the dough and arrange it to create the mushroom shapes with the chocolate exterior. Use red gel food coloring to tint parts of the dough and add white pearl sprinkles for the mushroom spots. Incorporate coarse sugar to enhance texture as desired.
- Create Icing: Mix powdered sugar with 1-2 tablespoons of heavy whipping cream and green gel food coloring to make a decorative icing for details on the cookies.
- Chill the Dough: Wrap the shaped dough into a log or desired shapes and refrigerate or freeze to firm up for at least 1 hour or up to overnight.
- Bake: Preheat the oven to 350°F (175°C). Slice the cookie logs into individual cookies and place them on a lined baking sheet. Bake for 10 minutes or until set but still soft in the center.
- Cool and Decorate: Allow cookies to cool on a wire rack. Use the prepared icing and extra sprinkles to decorate and enhance the mushroom design as desired.
Notes
- These cookies are slice-and-bake for easy preparation and storage.
- Keep dough in the freezer for convenient fresh baking later.
- Use room temperature butter and egg for best dough consistency.
- Adjust gel food coloring to achieve vivid mushroom colors.
- The cookies have a soft, thick texture perfect for a holiday treat.
Nutrition
- Serving Size: 1 serving
- Calories: 186 kcal
- Sugar: 15 g
- Sodium: 97 mg
- Fat: 8 g
- Saturated Fat: 5 g
- Unsaturated Fat: 2.4 g
- Trans Fat: 0.3 g
- Carbohydrates: 26 g
- Fiber: 1 g
- Protein: 2 g
- Cholesterol: 30 mg


Leave a Reply