If you’re a fan of rich, creamy chocolates that melt in your mouth, then this Chocolate Hazelnut Truffles Recipe is exactly what your dessert dreams are made of. These little bites of heaven combine roasted hazelnuts and velvety milk chocolate for an indulgent treat you can make right at home.

Jump to:
Why You'll Love This Recipe
I can’t get enough of making these truffles when the holidays roll around, but honestly, anytime of year is a great time to savor homemade chocolate candy. The balance of nutty, creamy, and sweet flavors makes them utterly irresistible.
- Simple Ingredients: You only need pantry staples like roasted hazelnuts and quality milk chocolate for a gourmet result.
- No-Bake, No Fuss: No oven needed — just mix, chill, dip, and enjoy.
- Perfect for Gifting: These truffles look fancy but are so easy to make, perfect for homemade holiday gifts or special occasions.
- Customizable Texture: The crushed hazelnut coating adds a lovely crunch that you can easily adjust to your preference.
Ingredients & Why They Work
When making chocolate hazelnut truffles, quality ingredients make all the difference. Choose well-roasted hazelnuts with skins removed for a smooth, rich flavor and avoid bitterness. Also, using trusted brands for melting wafers, like Ghirardelli, gives your truffles that beautiful glossy coating.
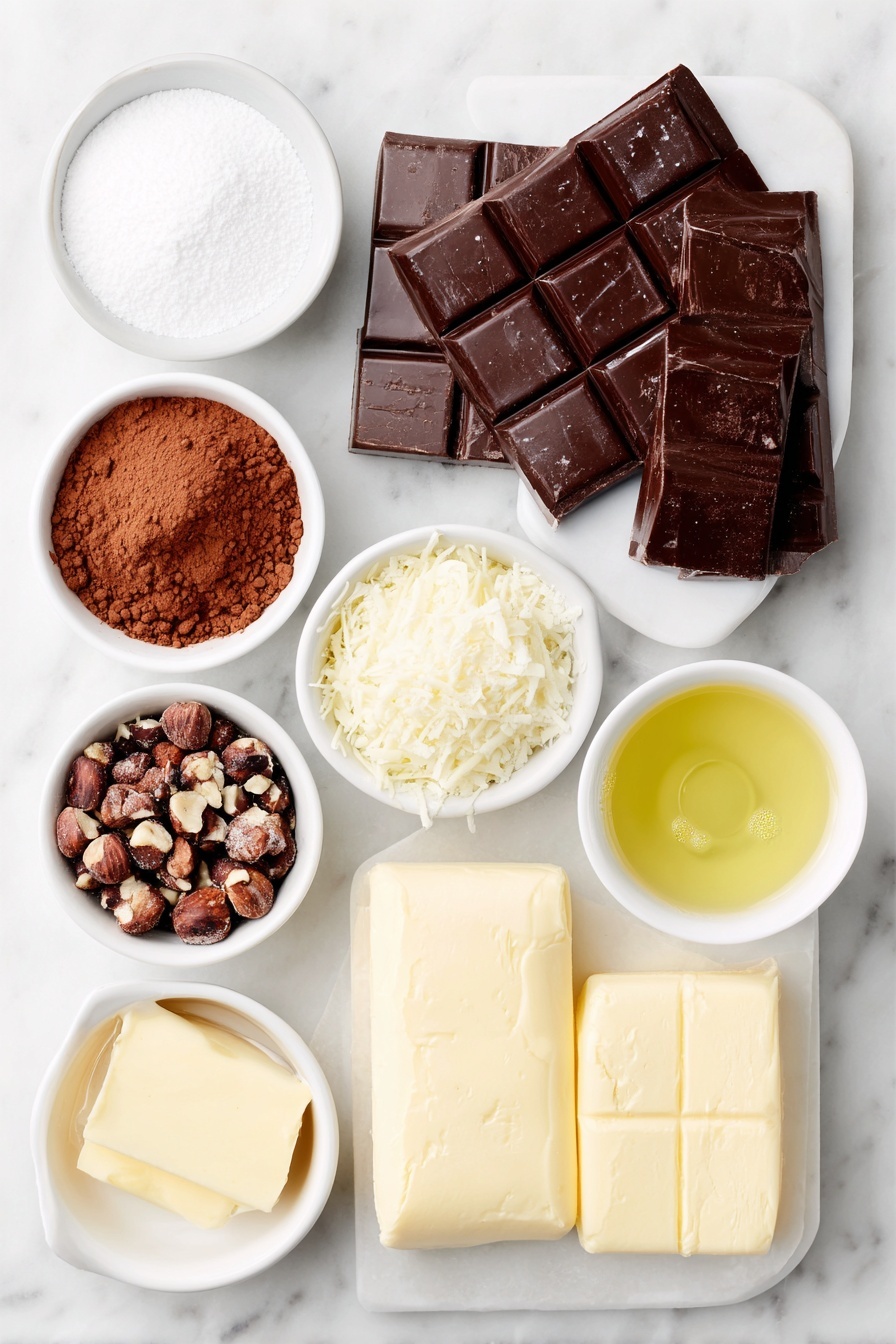
- Roasted hazelnuts, skins removed: Essential for that authentic nutty flavor and silky texture; removing skins prevents bitterness.
- Confectioner's sugar: Adds sweetness and helps balance the cocoa and nuts.
- Cocoa powder: Boosts the chocolate flavor and adds depth without overpowering sweetness.
- Vanilla extract: Enhances the overall flavor with a warm, aromatic touch.
- Vegetable oil (almond oil recommended): Helps bind the mixture smoothly without altering the taste.
- Milk chocolate melting wafers: For dipping and drizzling — give your truffles a shiny, luscious chocolate coating.
- Butter: Adds richness and smoothness to the melted chocolate.
- Crushed roasted hazelnuts: The finishing touch to add texture and extra nutty goodness.
Make It Your Way
The beauty of this Chocolate Hazelnut Truffles Recipe is how easily you can customize it to suit your tastes or occasion. Whether you prefer a bit more crunch, a flavor twist, or a dietary adjustment, these truffles are a fantastic canvas.
- Variation: For a festive holiday version, try adding a pinch of cinnamon or pumpkin spice to the hazelnut mixture before shaping. I once added a hint of espresso powder and it gave the truffles a delightful mocha flair that my friends couldn’t stop raving about.
- Nut-Free Alternative: If hazelnuts aren’t your thing, you can swap them for roasted almonds or cashews, adjusting the texture slightly but keeping that irresistibly creamy center.
- Dark Chocolate Lovers: Swap out the milk chocolate melting wafers for dark chocolate ones if you prefer a richer, less sweet coating. It mellows the overall sweetness and complements the nutty center beautifully.
- Extra Texture: For a double crunch, sprinkle some sea salt flakes over the truffles right after coating for a salty-sweet finish.
Step-by-Step: How I Make Chocolate Hazelnut Truffles Recipe
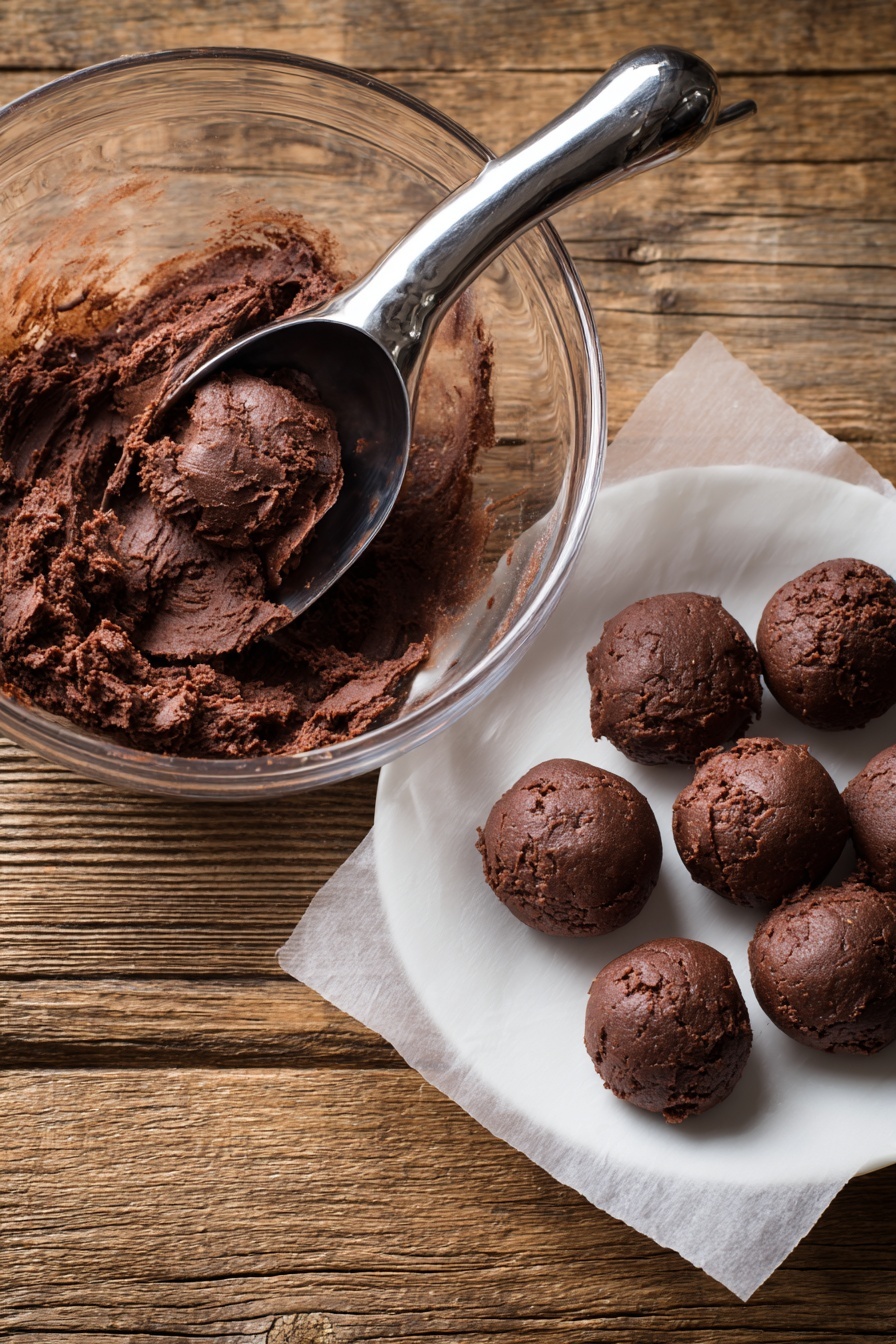
Step 1: Whirl Up the Creamy Hazelnut Mixture
Start by adding 2 cups of roasted hazelnuts (skins removed for smoothness) to your food processor, along with ¼ cup confectioner's sugar, 3 tablespoons cocoa powder, and 1 tablespoon vanilla extract. Blend everything until it's finely ground and gorgeous—like a rich nutty powder. Then, slowly pour in 4 tablespoons of vegetable oil (almond oil is my favorite for its subtle flavor), and keep processing until the mixture transforms into a smooth, sticky dough. You’ll know it’s ready when it holds together nicely but isn’t oily. This step sets the stage for that melt-in-your-mouth truffle center!
Step 2: Shape Your Little Gems
Using either your hands or a small cookie scoop, roll the nutty dough into about 48 small balls. I like to keep my hands slightly moist to avoid sticking, and try to make each truffle roughly the same size so they bake and chill evenly. Place the truffles on a parchment-lined baking sheet, then pop them into the fridge for at least 30 minutes. This chilling time firms them up nicely, making the next steps much easier and less messy.
Step 3: Melt the Smooth Chocolate Coating
While the truffles chill, melt 16 ounces of milk chocolate melting wafers with 1 tablespoon butter in a microwave-safe bowl or over a double boiler. Make sure to stir frequently to achieve a glossy, smooth consistency without burning. This luscious chocolate coating is what gives these truffles their signature irresistible exterior.
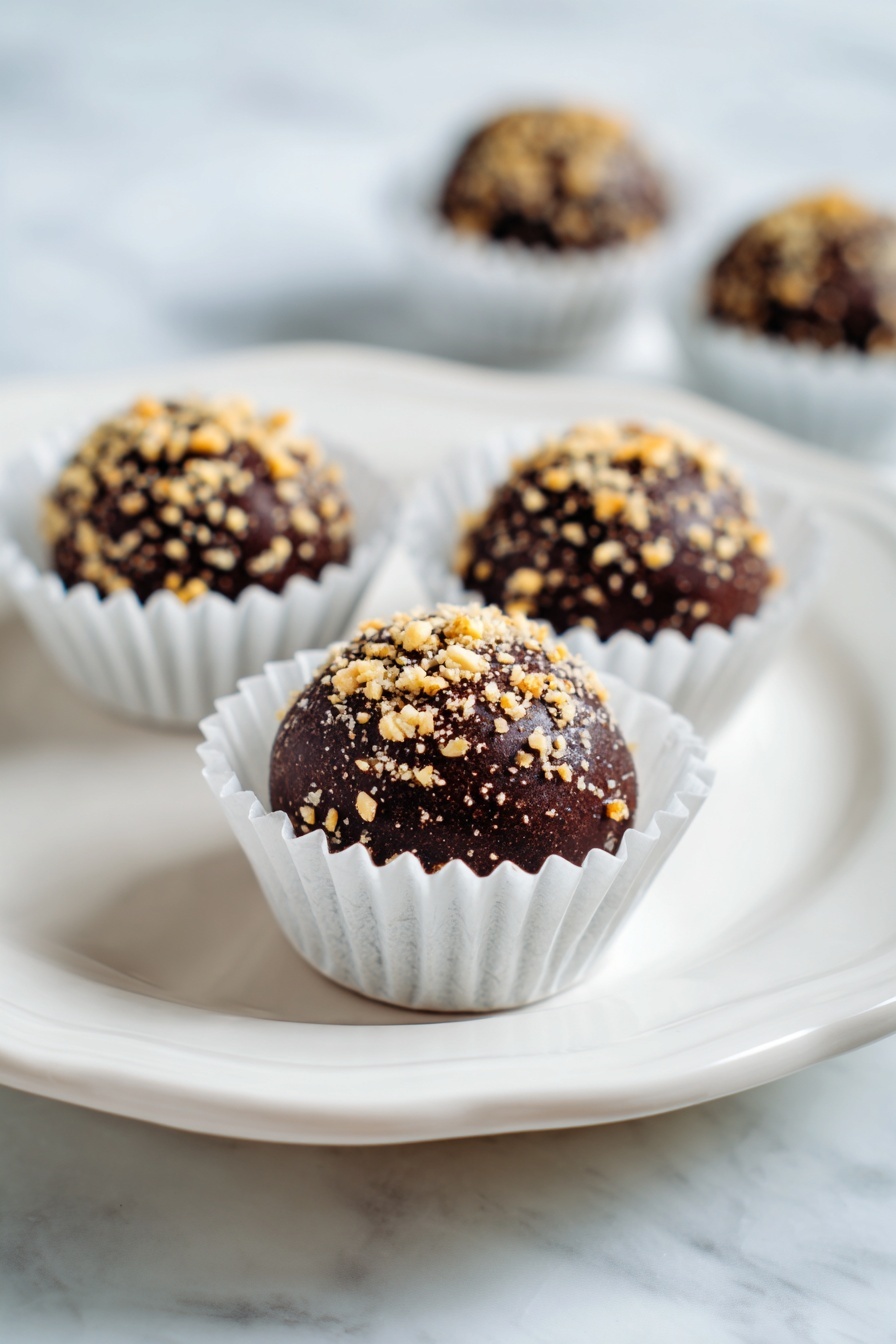
Step 4: Dip and Coat with Crunch
Take your firm hazelnut balls out of the fridge, then carefully dip each one into the melted chocolate using a fork or dipping tool. Let the excess chocolate drip back into the bowl for a clean coating. Lay each coated truffle back onto the parchment paper. Immediately roll or sprinkle them with the crushed roasted hazelnuts for an extra layer of texture and flavor. This step adds that delightful crunch that keeps you coming back for more.
Step 5: Chill and Optional Finish
Refrigerate the coated truffles for at least 30 minutes so the chocolate can set completely and harden to a perfect snap. If you're in the mood to make them extra fancy, melt the additional 1 cup of milk chocolate melting wafers separately and drizzle over the set truffles before refrigerating them one last time. This final touch looks stunning and adds an indulgent decorative flair perfect for gifting or entertaining.
Top Tip
These tips will help you achieve the most luscious and smooth Chocolate Hazelnut Truffles every time—because little details make a big difference in homemade confections!
- Perfectly Roasted Hazelnuts: From my experience, removing the skins from your roasted hazelnuts is a must for a smooth, rich texture and to avoid any bitterness.
- Consistent Chilling: I learned that refrigerating the truffle balls before dipping is key; it helps the chocolate coating set beautifully without melting the center.
- Gentle Chocolate Melting: Using a double boiler or stirring frequently in short bursts in the microwave keeps the milk chocolate smooth and glossy, which makes dipping effortless and neat.
- Even Coating Technique: Avoid thick patches by letting the excess chocolate drip off before placing truffles on parchment, ensuring they dry with a clean, professional look.
How to Serve Chocolate Hazelnut Truffles Recipe
Garnishes
While the crushed roasted hazelnuts coating adds a lovely crunch and nutty flavor, you can also get creative with dustings of cocoa powder, a sprinkle of flaky sea salt, or even a delicate drizzle of the extra melted milk chocolate for that elegant finish.
Side Dishes
Serve these truffles alongside a rich espresso, a sweet dessert wine, or a comforting cup of hot chocolate. They also pair beautifully with fresh berries or a light, whipped cream dessert to balance their richness.
Make Ahead and Storage
Storing Leftovers
Keep your Chocolate Hazelnut Truffles fresh by storing them in an airtight container in the refrigerator. They’ll stay delicious and ready to enjoy for up to 1 week. This also helps maintain their firm, bite-worthy texture.
Freezing
If you want to prepare in advance, truffles freeze well! Place them in a single layer on parchment paper in a freezer-safe container. Freeze for up to 3 months, then thaw overnight in the refrigerator before serving.
Reheating
Since these are no-bake treats, simply let frozen truffles come naturally to refrigerator temperature before serving. Avoid microwave reheating, as that can melt the chocolate coating and affect the texture.
Frequently Asked Questions:
Absolutely! Using dark chocolate is a great alternative if you prefer a more intense chocolate flavor. Just be sure to melt it gently to keep the coating smooth.
Yes, if almond oil isn’t available, you can substitute with other neutral vegetable oils like grapeseed or canola oil. They won’t overpower the hazelnut flavor and will keep the mixture smooth.
Removing the skins is recommended because it helps prevent bitterness and gives your truffles a silky texture. Roasting the hazelnuts first makes the skins easier to rub off.
Stored properly in an airtight container in the refrigerator, these truffles will last up to 1 week. You can also freeze them for up to 3 months for longer storage.
Final Thoughts
Making these Chocolate Hazelnut Truffles Recipe truly feels like a small act of love—each bite offers rich, creamy flavor with a satisfying crunch. Whether sharing them with friends or savoring them quietly at home, I hope these truffles bring you as much joy in making as in tasting. Happy truffling!
Print
Chocolate Hazelnut Truffles Recipe
- Prep Time: 1 hour
- Chilling Time: 30 minutes
- Cook Time: 0 minutes
- Total Time: 1 hour
- Yield: 48 truffles
- Category: Dessert
- Method: No-Cook
- Cuisine: International
- Diet: Vegetarian
Description
Delicious and creamy chocolate hazelnut truffles made with roasted hazelnuts, milk chocolate, and a touch of vanilla. These decadent treats are perfect for holidays, gifting, or anytime you want an indulgent homemade candy.
Ingredients
Truffle Base
- 2 cups roasted hazelnuts, skins removed
- ¼ cup confectioner's sugar
- 3 tablespoon cocoa powder
- 1 tablespoon vanilla extract
- 4 tablespoon vegetable oil (almond oil recommended)
Coating
- 1 cup milk chocolate melting wafers, melted (Ghirardelli recommended)
- 16 ounces milk chocolate melting wafers (Ghirardelli recommended)
- 1 tablespoon butter
- ¼ cup roasted hazelnuts, crushed
Instructions
- Prepare the Hazelnut Mixture: In a food processor, combine the roasted hazelnuts, confectioner's sugar, cocoa powder, and vanilla extract. Blend until finely ground and well mixed. Slowly add the vegetable oil and process until the mixture forms a smooth and sticky dough.
- Shape the Truffles: Using your hands or a small cookie scoop, form the hazelnut mixture into approximately 48 small balls. Place them on a parchment-lined baking sheet and refrigerate for at least 30 minutes to firm up.
- Melt the Chocolate Coating: In a microwave-safe bowl or double boiler, melt the 16 ounces of milk chocolate melting wafers with the butter until smooth and glossy, stirring frequently to avoid burning.
- Coat the Truffles: Dip each chilled hazelnut ball into the melted chocolate using a fork or dipping tool, allowing any excess chocolate to drip off. Place the coated truffles back onto the parchment paper.
- Decorate and Set: Immediately sprinkle or roll the coated truffles in the crushed roasted hazelnuts for extra texture and flavor. Refrigerate the truffles for at least 30 minutes or until the chocolate coating is completely set.
- Melt Additional Chocolate (Optional): If desired, warm the 1 cup of milk chocolate melting wafers separately and drizzle over the set truffles for decoration. Allow to set again before serving or packaging.
Notes
- Use high-quality roasted hazelnuts for the best flavor.
- Be sure to remove hazelnut skins to avoid bitterness and achieve a smooth texture.
- If almond oil is unavailable, substitute with another neutral vegetable oil like grapeseed or canola oil.
- Use a double boiler to melt chocolate gently and prevent burning.
- Refrigerate truffles well to ensure proper consistency and easy handling.
- Store truffles in an airtight container in the refrigerator for up to 1 week.
Nutrition
- Serving Size: 1 Tbsp
- Calories: 99 kcal
- Sugar: 5 g
- Sodium: 0.2 mg
- Fat: 8 g
- Saturated Fat: 2 g
- Unsaturated Fat: 6 g
- Trans Fat: 0.01 g
- Carbohydrates: 6 g
- Fiber: 1 g
- Protein: 1 g
- Cholesterol: 0 mg

Leave a Reply