There’s something irresistibly cozy about a cheesecake that’s bursting with caramelized, spiced flavors — that’s why this Biscoff Cookie Butter Cheesecake Recipe hits all the right notes. It’s creamy, dreamy, and full of that addictively sweet Biscoff cookie butter, making it the perfect dessert to impress without hours of fuss.

Jump to:
Why You'll Love This Recipe
This isn’t just any cheesecake — I first tried this Biscoff Cookie Butter Cheesecake Recipe last holiday season, and it quickly became a family favorite. It’s a wonderful balance of smooth cream cheese and that warm, cinnamon-spiced Biscoff flavor we all know and love. Plus, no baking means less stress for you and more time to focus on what matters.
- Ultra creamy texture: The cheesecake filling is so luscious, it practically melts on your tongue.
- Bold Biscoff flavor: Packed with cookie butter in every layer — crust, filling, and hidden surprise!
- No-bake convenience: You get all the richness without heating up your kitchen or waiting forever.
- Simple ingredients: Just a few basics that come together beautifully, even if you're not an experienced baker.
Ingredients & Why They Work
This Biscoff Cookie Butter Cheesecake Recipe uses simple, flavorful ingredients that build layers of taste and texture. Each element plays a part — from the buttery crust to the creamy filling and that irresistible hidden Biscoff layer.

- Biscoff cookies: These make a perfectly spiced, crunchy crust and add delightful texture when crumbled inside the cheesecake.
- Unsalted butter: Melted and mixed with the cookie crumbs, it binds the crust together and enriches its buttery flavor.
- Sea salt: Just a pinch enhances all the sweet and caramel notes, balancing the richness.
- Heavy whipping cream: Adds creaminess and lightens up the filling when whipped to soft peaks.
- Cream cheese: The star ingredient for cheesecakes; softened for smooth blending so you don’t end up with lumps.
- Powdered sugar: Sifted for a silky sweet finish without graininess.
- Biscoff spread: The magic ingredient that brings that signature cookie butter flavor across every layer, both solid and melted forms for different textures.
- Crumbled biscoff cookies: Hidden inside the cheesecake’s middle layer for a playful surprise bite.
Make It Your Way
I love experimenting with this cheesecake—sometimes I swirl in a touch of espresso powder for a mocha vibe, and other times I sprinkle chopped toasted pecans on top for crunch. Feel free to make it your own. The Biscoff is the star, but you can tweak sweetness or textures based on what you like best.
- Variation: When I’m feeling festive, I fold in some mini chocolate chips or add a drizzle of dark chocolate to complement the caramel flavor—it’s an absolute crowd-pleaser.
- Dairy-free option: Try swapping cream cheese and heavy cream for plant-based versions; the texture changes a bit but the Biscoff flavor still shines through.
- Seasonal twist: Add a handful of chopped dried figs or cranberries for a touch of tartness and added color during winter holidays.
Step-by-Step: How I Make Biscoff Cookie Butter Cheesecake Recipe

Step 1: Crush the Cookies & Make the Crust
I like to pulse Biscoff cookies in a food processor until they're fine crumbs but still hold a little texture—no one wants a totally powdery crust! Stir in the melted unsalted butter and a pinch of sea salt until the mixture holds together when pressed. Then, press it firmly into the base of your springform pan—it helps to use the back of a measuring cup for even, compact crust.
Step 2: Whip the Cream & Cream Cheese
In your mixing bowl, whip the cold heavy cream until soft peaks form—this adds lightness later. In another bowl, beat the softened cream cheese with sifted powdered sugar and a dash of salt until smooth and creamy. This is key because lumps will be noticeable in your final cheesecake.
Step 3: Blend in the Biscoff Spread & Layer the Cheesecake
Fold in the Biscoff spread gently into the cream cheese mixture to keep it airy. Now, pour half the filling over your cookie crust and smooth it out. Sprinkle the crumbled Biscoff cookies evenly over this layer, then drizzle melted Biscoff spread for that “wow” middle surprise. Top with the remaining filling and smooth the surface. It’s like a Biscoff cheesecake dream inside and out.
Step 4: Chill & Serve
Cover the cheesecake and refrigerate for at least 4 hours, preferably overnight — patience really pays off here. When ready, release the springform pan sides carefully, garnish as you like, slice, and enjoy.
Top Tip
From my kitchen to yours, here are some tips that really helped me nail this cheesecake every time and avoid common mistakes I made at first.
- Softening Cream Cheese: Make sure the cream cheese is room temperature to prevent lumps in your filling. If it’s too cold, beat it gently with a spatula before mixing.
- Chilling is Crucial: Don’t rush the chilling step—letting it set overnight gives the flavors time to meld and the texture to firm up perfectly.
- Crust Pressing: Press the crust evenly and firmly to avoid crumbly slices. Using a flat-bottomed glass or cup works like magic.
- Avoid Overmixing: When folding in whipped cream and Biscoff spread, be gentle to keep the cheesecake light and airy.
How to Serve Biscoff Cookie Butter Cheesecake Recipe

Garnishes
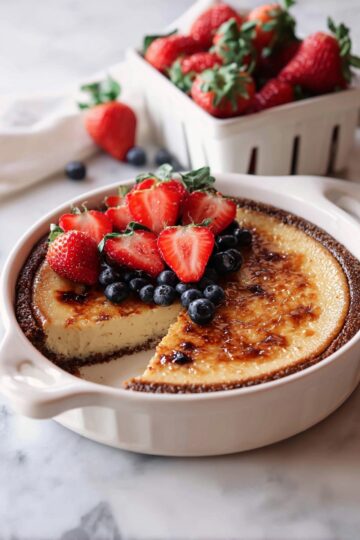
I love topping this cheesecake with a few extra crumbled Biscoff cookies—it adds a fun crunch. Sometimes I drizzle leftover melted Biscoff spread on top or add a dollop of whipped cream for that extra creamy bite. Fresh berries like raspberries also brightened up the plate wonderfully.
Side Dishes
This cheesecake pairs beautifully with a simple cup of coffee or chai tea—the spices complement each other well. For larger gatherings, serving alongside vanilla ice cream or caramel sauce turns it into an indulgent dessert spread.
Creative Ways to Present
For special occasions, I slice this cheesecake into mini jars or clear cups and layer extra cookie crumbs and Biscoff spread on top. It makes a stunning presentation and is perfect for casual parties or potlucks.
Make Ahead and Storage
Storing Leftovers
Leftover Biscoff Cookie Butter Cheesecake is best refrigerated, tightly covered, for up to 4 days. I keep mine in the same springform pan, just sealed with plastic wrap to prevent it from absorbing other fridge odors.
Freezing
I’ve frozen leftover slices wrapped individually in plastic wrap and foil with great results. When thawed overnight in the fridge, they retain their creamy texture — perfect for prepping in advance for parties!
Reheating
I usually don’t reheat cheesecake since it’s meant to be served chilled, but allowing frozen slices to come to room temperature for 15–20 minutes enhances the soft, creamy mouthfeel.
Frequently Asked Questions:
Using peanut butter will give you a very different flavor since Biscoff is spiced and caramelized. You can try it for a peanut butter cheesecake twist, but keep in mind the signature Biscoff taste won’t be there.
This recipe uses Biscoff cookies, which contain gluten. If you need gluten-free, look for gluten-free spiced cookie alternatives and gluten-free spreads.
It's possible to substitute vegan cream cheese and non-dairy cream, but the texture may vary. Vegan Biscoff spreads exist, so you can adapt the recipe, but expect a slightly different consistency.
For best results, chill the cheesecake for at least 4 hours, but preferably overnight. This ensures it fully sets and the flavors blend nicely.
Final Thoughts
This Biscoff Cookie Butter Cheesecake Recipe has a special place in my heart because it’s a dessert that looks impressive but feels so laid-back to make. Whether you’re celebrating a milestone or just treating yourself on a quiet weekend, it’s a reliably delicious way to elevate your dessert game. Give it a go—you’ll love the way it brings a little magic to your table and your taste buds.
Print
Biscoff Cookie Butter Cheesecake Recipe
- Prep Time: 20 minutes
- Cook Time: 0 minutes
- Total Time: 4 hours 20 minutes
- Yield: 12 servings
- Category: Dessert
- Method: No-Cook
- Cuisine: American
- Diet: Vegetarian
Description
This Biscoff Cheesecake is a no-bake, ultra creamy dessert featuring a biscoff cookie crust, layers of biscoff spread, and crumbled biscoff cookies for extra texture and flavor. It's a cookie butter cheesecake dream that's easy and fast to make with simple ingredients.
Ingredients
Crust
- 13 oz biscoff cookies (about 1.5 packs, 375g)
- 5 tablespoons unsalted butter (melted)
- ¼ teaspoon sea salt
Cheesecake Filling
- 1 ¼ cup heavy whipping cream (cold)
- 24 oz cream cheese (softened)
- ⅛ teaspoon sea salt
- 2 cups powdered sugar (sifted)
- 1 cup biscoff spread
Layer & Topping
- ¼ cup biscoff spread (melted)
- 6 biscoff cookies (crumbled)
- ¾ cup biscoff spread (melted)
- 8 biscoff cookies (crumbled)
Instructions
- Prepare the crust: Crush the 13 oz biscoff cookies into fine crumbs. Mix them with melted unsalted butter and ¼ teaspoon sea salt until combined. Press the mixture evenly into the bottom of a springform pan to form the crust. Chill in the refrigerator while preparing the filling.
- Make the cheesecake filling: In a large bowl, whip the cold heavy cream until stiff peaks form. In another bowl, beat the softened cream cheese with ⅛ teaspoon sea salt until smooth. Gradually add the sifted powdered sugar and biscoff spread, mixing until fully incorporated and creamy.
- Combine cream and filling: Gently fold the whipped cream into the cream cheese mixture to keep the filling light and airy.
- Layer the cheesecake: Spread half of the cheesecake filling evenly over the prepared crust. Drizzle ¼ cup melted biscoff spread over this layer and sprinkle with 6 crumbled biscoff cookies. Carefully spread the remaining cheesecake filling on top.
- Add the topping: Drizzle ¾ cup melted biscoff spread evenly over the top layer and sprinkle with 8 crumbled biscoff cookies for garnish.
- Chill and set: Refrigerate the cheesecake for at least 4 hours or preferably overnight to allow it to fully set before serving.
Notes
- This cheesecake is no-bake, so chilling time is essential for the texture to set properly.
- If biscoff spread is too thick to drizzle, warm it slightly to achieve a pourable consistency.
- For a firmer crust, press the cookie mixture firmly and chill before adding the filling.
- Use cold heavy cream for better whipping results and fluffier filling.
- Store leftovers covered in the refrigerator for up to 4 days.
Nutrition
- Serving Size: 1 serving
- Calories: 718 kcal
- Sugar: 46 g
- Sodium: 628 mg
- Fat: 41 g
- Saturated Fat: 16 g
- Unsaturated Fat: 10 g
- Trans Fat: 0.2 g
- Carbohydrates: 73 g
- Fiber: 1 g
- Protein: 15 g
- Cholesterol: 47 mg


Leave a Reply