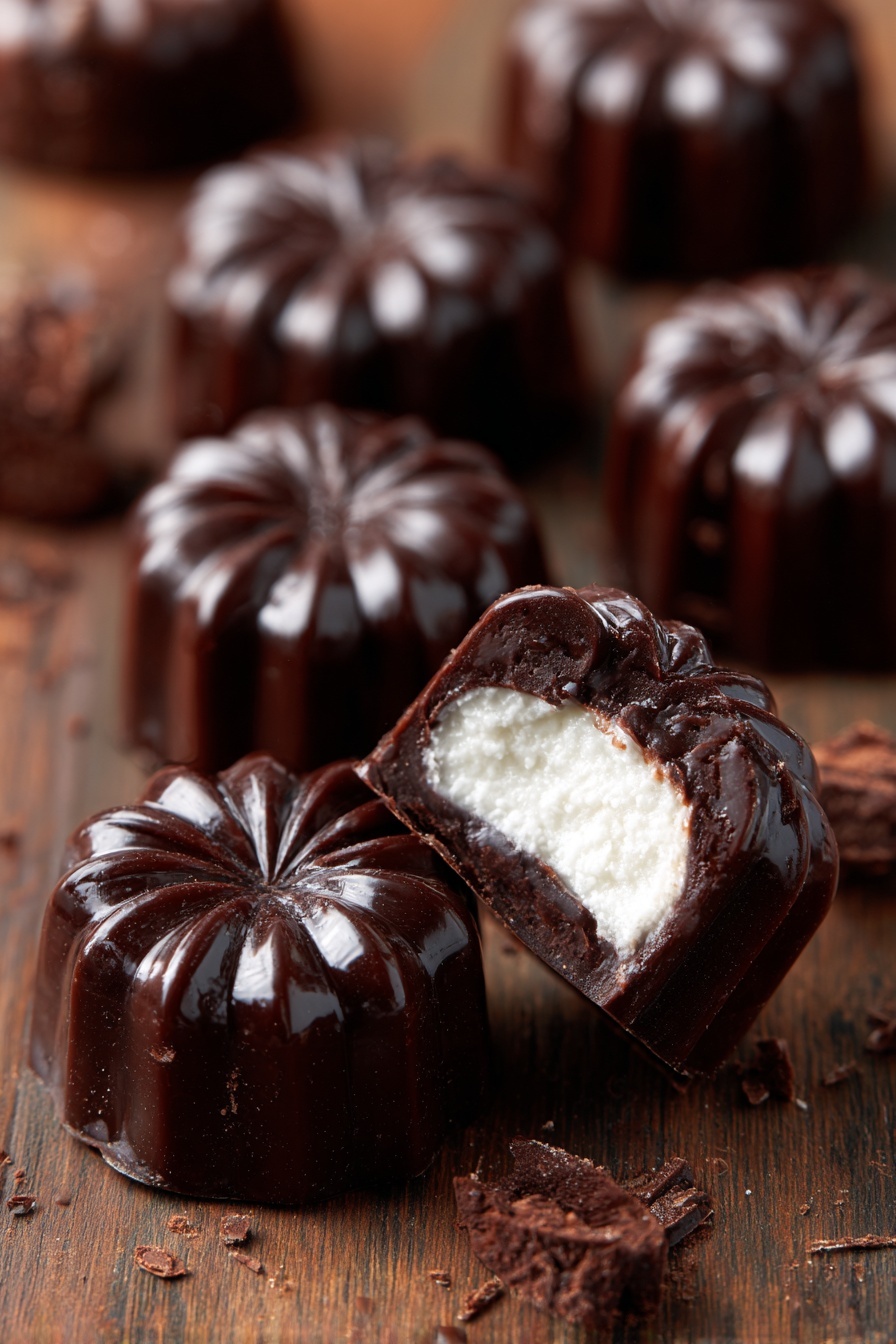
If you’ve ever dreamed of making your own fancy chocolates at home, I’ve got just the thing: my Meyer Lemon Filled Chocolates Recipe. These treats marry smooth dark chocolate with a zesty, sweet lemon filling that’s downright irresistible.

Jump to:
Why You'll Love This Recipe
I love these Meyer lemon filled chocolates because they bring a bright burst of citrus to rich dark chocolate — it’s like sunshine and indulgence wrapped up in one bite. Plus, making them yourself is easier than you might think!
- Simple Ingredients: Uses just a few basics but results in gourmet-quality chocolates.
- Fun Technique: Working with candy molds and chocolate always makes me feel like a pro chocolatier.
- Customizable Flavor: You can control the tartness and sweetness of the lemon filling to suit your taste.
- Great for Gifting: Beautiful, homemade chocolates that everyone will adore.
Ingredients & Why They Work
This recipe is super approachable because it focuses on quality ingredients you can find easily, like good melting chocolate and fresh Meyer lemons. Using candy molds and a paintbrush gives you control over how your chocolates turn out, so each piece looks just right.
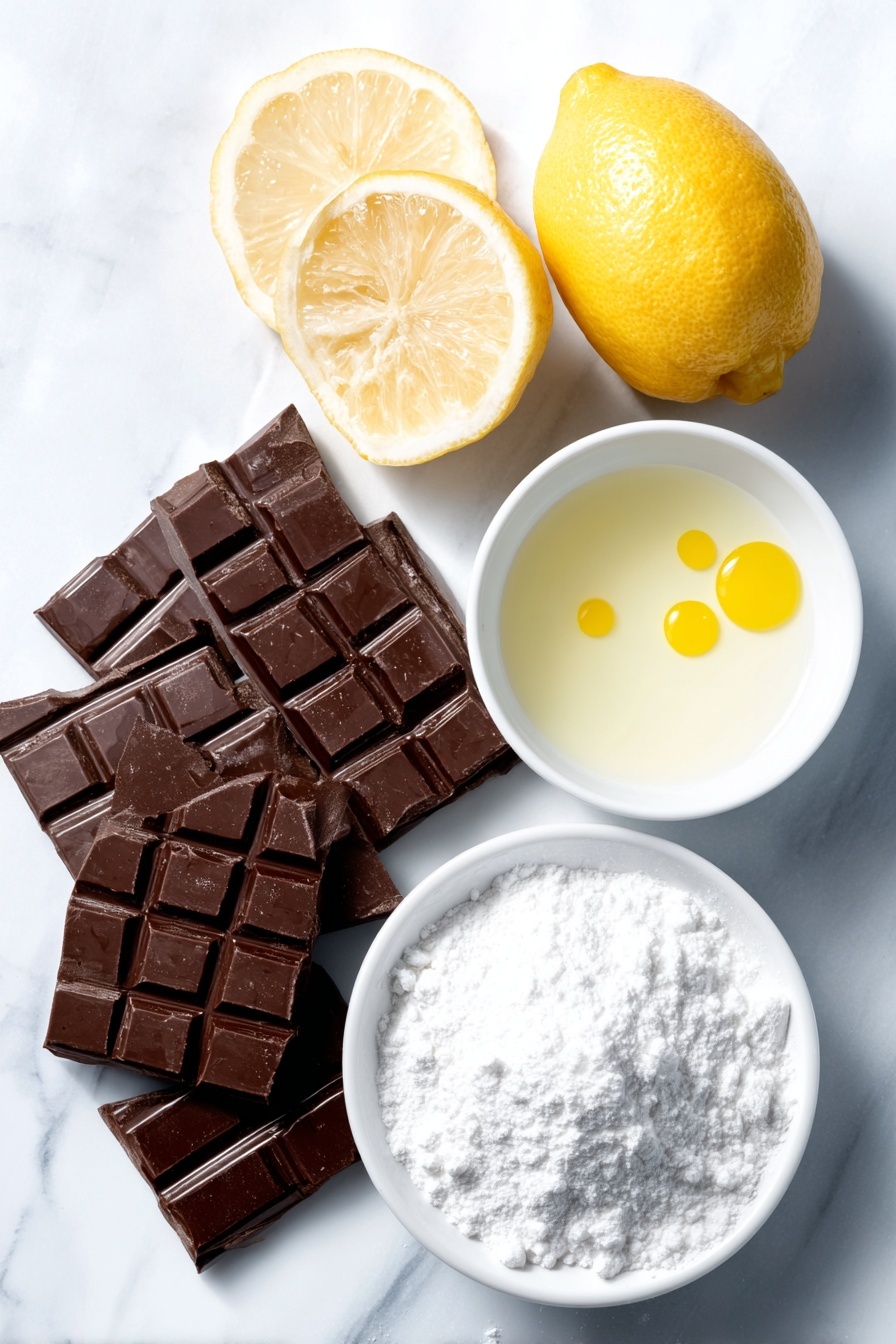
- Dark chocolate melting wafers: These melt smoothly and solidify with a perfect snap, making them ideal for chocolate shells.
- Meyer lemon juice: The star of the filling — its sweetness and fragrant tang set it apart from regular lemons.
- Confectioner's sugar: Sweetens and thickens the lemon juice into a luscious filling that holds up inside the chocolate shell.
- Yellow gel food coloring (optional): Adds a beautiful golden hue, making your lemon filling pop visually.
- Candy molds: Essential for shaping your chocolates neatly and professionally.
- Small paintbrush: Perfect for coating molds evenly with chocolate and avoiding waste.
Make It Your Way
One of the best things about this Meyer Lemon Filled Chocolates Recipe is how easy it is to make it your own. Whether you love it extra zesty or prefer a more subtle lemon touch, there’s plenty of room to tweak and personalize these treats.
- Variation: I love adding a pinch of finely grated Meyer lemon zest right into the lemon filling to give it an extra burst of fresh citrus aroma. It brightens the flavor and makes these chocolates truly addictive.
- Dietary twist: For a vegan-friendly option, swap the dark chocolate melting wafers for a dairy-free brand, and you’re all set.
- Seasonal flair: Around the holidays, try adding a tiny pinch of ground cardamom or ginger to the lemon filling—makes for a wonderfully festive spin!
- Color customization: The yellow gel food coloring is totally optional but adds such a happy pop of color. Feel free to experiment with other hues if you want to match a special occasion.
Step-by-Step: How I Make Meyer Lemon Filled Chocolates Recipe

Step 1: Smooth, Glossy Chocolate Prep
Start by measuring about one heaping cup of dark chocolate melting wafers and placing them in a microwave-safe glass measuring cup. Microwave for 1 minute, then stir really well until you see a shiny, smooth texture. If some pieces are still stubborn, zap it for 10 more seconds at a time, stirring in between. Working in batches like this keeps the chocolate luscious and prevents it from overheating.
Step 2: Coating the Candy Molds
Fill each cavity in your candy mold about halfway with the melted chocolate. Grab a small paintbrush and gently swirl the chocolate around to coat every nook and cranny of the mold. This helps create a nice, even shell. Pop the mold into the fridge and chill for 15 to 20 minutes until set and firm to the touch.
Step 3: Crafting the Lemon Filling
In a bowl, combine roughly 3 cups of confectioner's sugar with the juice of one Meyer lemon. Stir vigorously until the mixture thickens up nicely and develops a glossy sheen. This part is all about balance — if the filling feels too runny, gradually add more sugar; if it’s too stiff, splash in a bit more lemon juice. For a sunny pop, add a few drops of yellow gel food coloring.
Step 4: Filling Those Chocolate Cavities
Use a small spoon or dropper to dollop the lemon filling into each chocolate mold cavity. Be careful not to overfill—leaving just enough space for the final chocolate topping keeps everything neat without overflow.
Step 5: Sealing with a Chocolate Cap
Drizzle the melted chocolate back and forth over the lemon filling in each mold cavity. This motion ensures you fully cover the filling and helps it stay in place. The back-and-forth drizzle also creates a smooth, polished finish on top.
Step 6: Setting the Chocolates
Tap the mold firmly on the counter a few times to release trapped air bubbles—this helps prevent unwanted holes in your finished chocolates. Then, refrigerate for about 30 minutes, or until the chocolates are completely firm and set.
Step 7: The Big Reveal
Once chilled and set, flip your mold over and give it a confident, sharp tap on the counter—the chocolates should pop right out. Store them in a cool, dry place until you’re ready to share or savor them yourself.
Top Tip
These tips will help you achieve perfectly smooth and luscious Meyer Lemon Filled Chocolates every time, making the process easier and more enjoyable.
- Temperature Control: Always temper your dark chocolate by microwaving in short bursts and stirring thoroughly to avoid overheating and seizing.
- Filling Consistency: I adjusted the lemon filling thickness based on experience — thicker filling holds its shape better, while thinner fillings deliver a punchier lemon flavor.
- Even Coating: Using a small paintbrush to coat the mold cavities ensures an even chocolate shell, preventing thin spots that can cause breaking.
- Avoid Moisture: Make sure your candy molds are completely dry before pouring chocolate to achieve smooth, shiny chocolates without streaks or bloom.
How to Serve Meyer Lemon Filled Chocolates Recipe
Garnishes
Elevate these chocolates with a light dusting of edible gold powder or a sprinkle of finely grated Meyer lemon zest on top for a pretty finishing touch. You can also serve them alongside a small fresh herb sprig like mint or thyme for a burst of fresh aroma that complements the citrus.
Side Dishes
Pair these Meyer Lemon Filled Chocolates with a crisp cup of Earl Grey tea or a bright sparkling wine to balance the tartness. They also work wonderfully beside a bowl of fresh berries or a scoop of lemon sorbet if you’re putting together a dessert platter.
Make Ahead and Storage
Storing Leftovers
Store your Meyer Lemon Filled Chocolates in an airtight container in a cool, dry place away from direct sunlight to preserve their shape and flavor. Properly stored, they will stay fresh for up to two weeks.
Freezing
You can freeze these chocolates by placing them in a single layer on a baking sheet until solid, then transferring them to an airtight container or freezer bag. Freeze for up to 3 months. Thaw in the refrigerator before serving to avoid condensation forming on the chocolate surface.
Reheating
Since these are no-cook chocolates, reheating is not necessary. If your chocolates soften slightly at room temperature, simply pop them back into the refrigerator for 15-20 minutes to firm up before enjoying.
Frequently Asked Questions:
Yes, you can substitute regular lemons, but Meyer lemons provide a sweeter, less tart flavor that complements the dark chocolate beautifully. Using regular lemons may result in a more acidic filling.
Store the chocolates in a cool, dry place at a consistent temperature. Avoid temperature fluctuations and humidity. Properly drying the molds and tempering the chocolate help maintain a glossy finish and firm texture.
Make sure the chocolates are fully set and chilled before removing. Flip the mold over and tap firmly but gently on the counter to release the chocolates cleanly. If chocolates stick, let them chill a bit longer.
Yes! Use dairy-free dark chocolate melting wafers and ensure your confectioner’s sugar does not contain bone char. This keeps the recipe delicious and vegan-compliant.
Final Thoughts
Making these Meyer Lemon Filled Chocolates Recipe at home is such a rewarding experience — the balance of rich dark chocolate with the bright, tangy filling captivates the palate like no store-bought treat can. Whether sharing as a heartfelt gift or savoring them yourself, these chocolates bring a touch of gourmet magic into everyday life. I hope you enjoy crafting and tasting them as much as I do!
Print
Meyer Lemon Filled Chocolates Recipe
- Prep Time: 15 minutes
- Chilling Time: 50 minutes
- Cook Time: 0 minutes
- Total Time: 65 minutes
- Yield: 48 pieces
- Category: Dessert
- Method: No-Cook
- Cuisine: American
- Diet: Vegetarian
Description
Delight in these homemade Meyer Lemon Filled Chocolates, combining rich dark chocolate with a tangy, sweet lemon filling. Perfectly crafted using candy molds and a simple lemon-sugar mixture, these gourmet treats offer a balance of bold chocolate and refreshing citrus flavors, ideal for gifting or personal indulgence.
Ingredients
Chocolate Shell
- 2 cups dark chocolate melting wafers
Lemon Filling
- the juice of 1 Meyer Lemon
- 3 cups confectioner's sugar, approximately
- yellow gel food coloring, optional
Tools
- candy molds
- a small paintbrush
Instructions
- Prepare the Chocolate: Measure about one heaping cup of dark chocolate melting wafers and place them into a microwave-safe glass measuring cup. Microwave for 1 minute, then stir until the chocolate is smooth and glossy. If melting is incomplete, microwave in additional 10-second bursts, stirring after each, until fully melted.
- Coat the Molds: Fill each cavity of your candy mold halfway with melted chocolate. Use a small paintbrush to evenly coat the entire surface of each mold cavity with chocolate. Once coated, place the mold in the refrigerator and chill for 15 to 20 minutes until set.
- Make the Lemon Filling: In a bowl, combine approximately 3 cups of confectioner's sugar with the juice of 1 Meyer lemon. Stir vigorously until the mixture becomes thick and glossy. Adjust the consistency by adding more sugar if too thin, or more lemon juice if too thick. Add a few drops of yellow gel food coloring if desired for a vibrant hue.
- Fill the Molds: Using a spoon or dropper, dab or drizzle a small amount of the lemon filling into each chocolate mold cavity, ensuring not to overfill, so the filling does not overflow when the final chocolate layer is added.
- Seal with Chocolate: Drizzle melted chocolate over the lemon filling in each mold cavity in a back-and-forth motion to fully cover the filling. This technique helps keep the filling in place and creates a smooth top layer.
- Set the Chocolates: Firmly tap the mold on the counter several times to release any air bubbles trapped inside. Then place the mold in the refrigerator for about 30 minutes, or until completely set.
- Remove and Enjoy: Once set, flip the mold over and tap sharply on the counter to release the chocolates. Store in a cool place until ready to serve.
Notes
- Work in small batches to prevent the chocolate from hardening during coating.
- Adjust the lemon filling thickness to your taste preference — thicker for less tartness, thinner for a more pronounced lemon flavor.
- Yellow gel food coloring is optional but adds an appealing look to the lemon filling.
- Ensure molds are completely dry before use for best chocolate coating adherence.
- Store finished chocolates in a cool, dry place to prevent melting or blooming.
Nutrition
- Serving Size: 1 piece
- Calories: 80 kcal
- Sugar: 8 g
- Sodium: 0 mg
- Fat: 4 g
- Saturated Fat: 2.5 g
- Unsaturated Fat: 1.5 g
- Trans Fat: 0 g
- Carbohydrates: 10 g
- Fiber: 1 g
- Protein: 1 g
- Cholesterol: 0 mg

Leave a Reply