There’s something undeniably festive and utterly irresistible about the Candy Cane No-Bake Delight Recipe. Layers of creamy white chocolate pudding, peppermint crunch, and a fudgy Oreo crust make it a magical treat that’s as easy to whip up as it is to enjoy.

Jump to:
Why You'll Love This Recipe
I first made this Candy Cane No-Bake Delight Recipe during the holidays, and it quickly became a crowd favorite. It’s festive without the fuss, so you get all the seasonal joy with none of the oven heat—a total win in my book.
- Effortless Assembly: You don't have to turn on the stove or oven, making it perfect for busy holiday prep.
- Layered Flavors: Every bite has the perfect balance of minty candy canes, creamy filling, and chocolatey crust.
- Make-Ahead Friendly: It chills beautifully, so you can prep it a day in advance, freeing up your party day.
- Kid-Approved: The sweet and cool peppermint vibe is a hit with kids and grown-ups alike.
Ingredients & Why They Work
This combination of ingredients comes together to create a dessert that’s creamy, crunchy, and festive. Each component plays a key role, so here’s a little insight to help you shop and understand why they’re perfect for this no-bake delight.
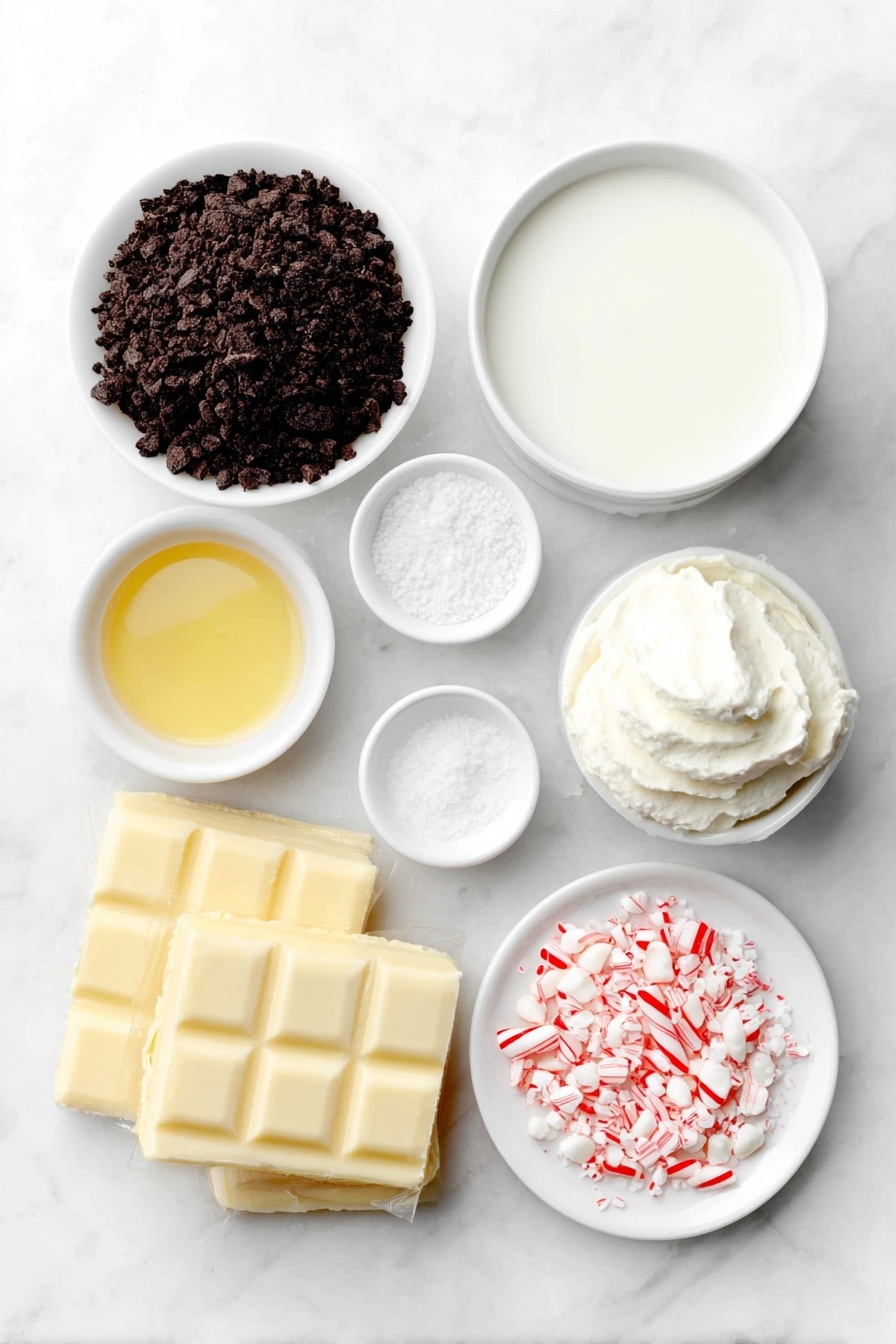
- Oreo Cookies: Gives a sturdy, chocolaty base and a little crunch; crushing them in a food processor makes the crust easy to pack firmly.
- Unsalted Butter: Binds the cookie crumbs together with rich moisture without overpowering flavor.
- Salt: Just a pinch enhances all the sweetness and chocolate notes beautifully.
- Cream Cheese: Adds tangy creaminess and smooth texture, balancing the sweet layers.
- Powdered Sugar: Sweetens the cream cheese layer evenly, dissolving effortlessly for a silky finish.
- Milk: Keeps the cream cheese filling loose enough for easy spreading.
- Whipped Topping: Lightens both the cream cheese and pudding layers, creating that fluffy, melt-in-your-mouth experience.
- Crushed Candy Canes: Delivers that iconic peppermint crunch and festive look, divided between layers and topping for punch in every bite.
- White Chocolate Pudding Mix: Provides a rich, indulgent layer with sweet white chocolate flavor, setting nicely without baking.
- Cold Milk (for pudding): Activates the pudding mix and ensures smooth, creamy texture when whisked well.
Make It Your Way
One of my favorite things about this Candy Cane No-Bake Delight Recipe is how easy it is to tweak. I often swap out the candy canes for crushed peppermint bark just for something a bit more textured or add a splash of vanilla extract to the cream cheese layer to amp up the flavor.
- Variation: For a dairy-free twist, use a non-dairy cream cheese and whipped topping; it still tastes fantastic and keeps the same layered magic.
- Seasonal Switch: Outside winter, swapping candy canes for crushed toffee bits or even fresh berries works wonderfully for a lighter vibe.
- Difficulty Level: This recipe is perfect for beginners but feels fancy enough to impress guests.
Step-by-Step: How I Make Candy Cane No-Bake Delight Recipe
Step 1: Create the Perfect Oreo Crust
Grab your food processor and pulse those Oreos into fine crumbs—no big chunks! If you don’t have one, pop them in a sealed plastic bag and crush with a rolling pin. Then add the salt and melted butter and pulse just until the crumbs clump together like wet sand. Press this mixture firmly into the bottom of a 9x13-inch dish—this crust holds all the layers perfectly. Pop it in the fridge to chill while you move on.
Step 2: Whip Up the Cream Cheese Layer
In a medium bowl, beat softened cream cheese until smooth—no lumps, please! Gradually add powdered sugar and milk, beating for about 2 minutes until silky and spreadable. Gently fold in one cup of the whipped topping and half of your crushed candy canes. This combo creates that dreamy, minty creaminess. Spread this layer evenly over your chilled crust.
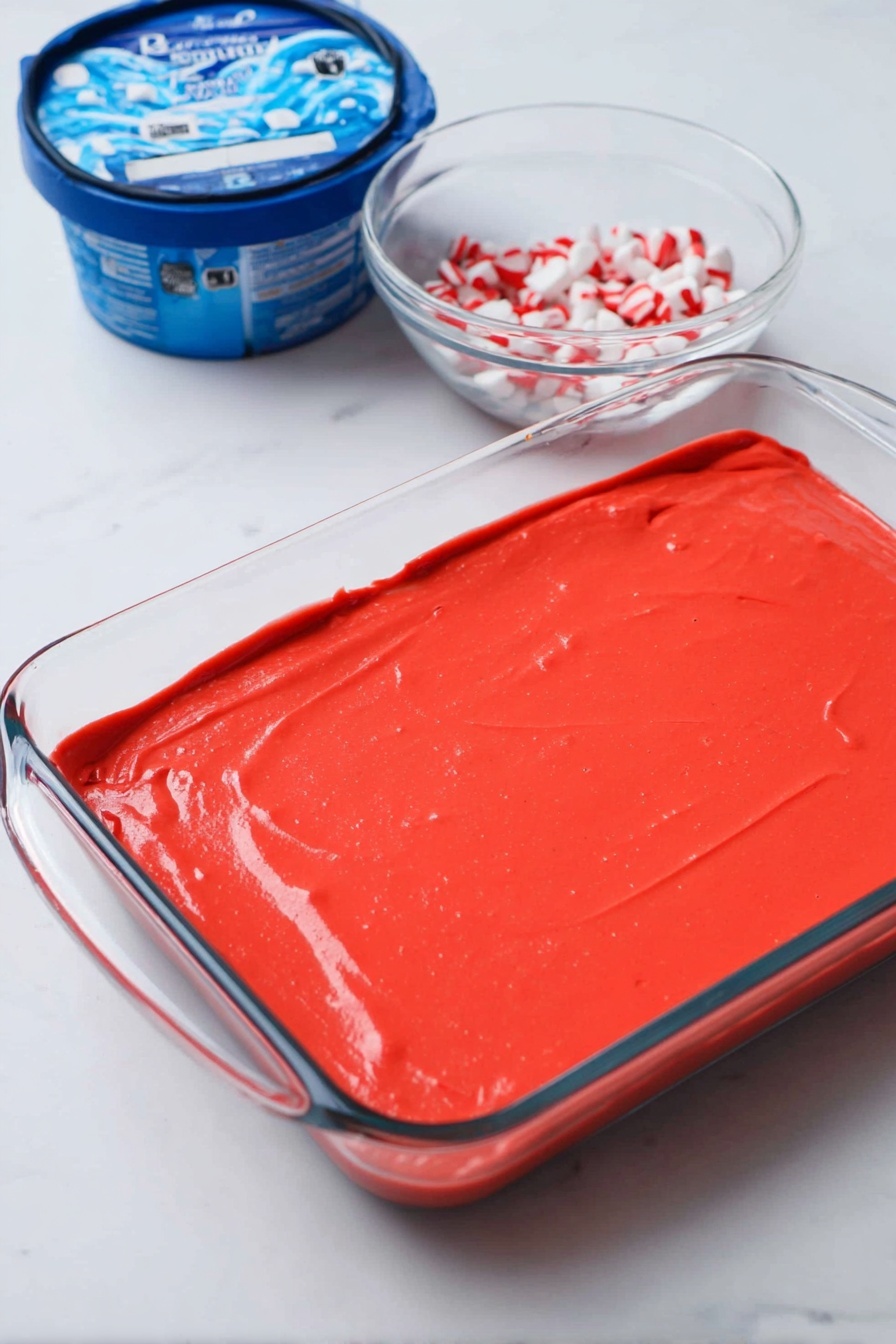
Step 3: Prepare the White Chocolate Pudding Layer
Start with a clean bowl and whisk the white chocolate pudding mix with 2 ¾ cups of cold milk for about 2 minutes until it thickens nicely. Spread this luscious pudding all over the cream cheese layer to build those decadent middle layers.
Step 4: Top It Off and Chill
Smooth the remaining whipped topping over the pudding layer, then cover your dish tightly with plastic wrap or foil. Chill for at least four hours—overnight is even better because the flavors meld together beautifully.
Step 5: Finish with a Peppermint Crunch
Right before serving, sprinkle the rest of the crushed candy canes on top for an extra festive pop and that satisfying crunch everyone loves.
Top Tip
I’ve made this Candy Cane No-Bake Delight Recipe dozens of times, and these tips saved me from a few frustrating misses. Remember, the crust should be well-pressed but not soggy, and folding gently keeps the layers light and airy.
- Crust Pressing: Use the bottom of a measuring cup to press the crust; it compacts evenly without crushing the crumbs.
- Cream Cheese Soften Carefully: Let cream cheese come to room temp fully for smoothest texture — no one wants lumps!
- Whipped Topping Folding: Fold rather than stir to keep the cream cheese layer fluffy and light.
- Chill Time: Don’t rush – the pudding needs time to set firmly so each slice holds its layers perfectly.
How to Serve Candy Cane No-Bake Delight Recipe
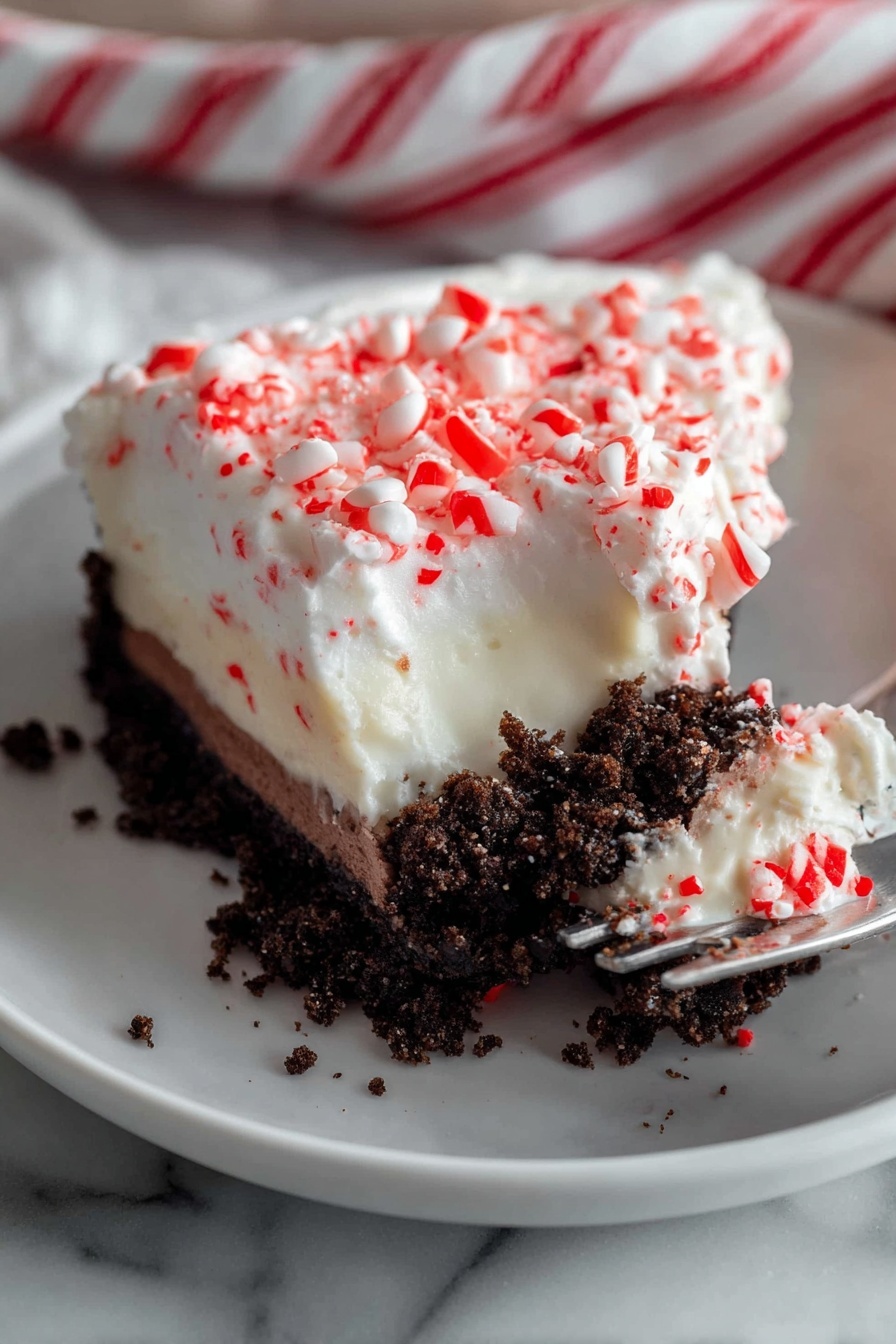
Garnishes
I love adding some whole mini candy canes or shaved white chocolate curls right before serving for an extra special look and texture. Fresh mint leaves also add a refreshing touch and pop of color if you’re feeling fancy.
Side Dishes
Pair this no-bake delight with hot cocoa or a warm cup of coffee for cozy contrast. Light fruit trays or a citrus salad on the side work well too, balancing the richness of the dessert.
Creative Ways to Present
For holiday parties, I sometimes serve this dessert in individual small mason jars—perfect for grab-and-go and gifting. Layered desserts always impress in glasses, and it’s a great way to make portions look fancy and festive.
Make Ahead and Storage
Storing Leftovers
Keep your Candy Cane No-Bake Delight refrigerated, tightly covered with plastic wrap. It maintains freshness and texture for up to 4 days, which is great because it’s often gone by then!
Freezing
I’ve frozen leftovers wrapped in foil and placed in an airtight container. It thaws well in the fridge overnight, but I’d recommend enjoying fresh whenever possible to keep that dreamy creamy texture.
Reheating
This dessert doesn’t need reheating—it’s best served chilled. Just let it sit at room temperature for 15 minutes if it’s been in the fridge too long for a softer bite.
Frequently Asked Questions:
Absolutely! One of the best things about the Candy Cane No-Bake Delight Recipe is that it’s perfect for making ahead. In fact, chilling it overnight greatly improves the flavor and lets the layers set perfectly.
No worries! Just place the Oreos inside a sealed plastic bag, then use a rolling pin or heavy pan to crush them until you get fine crumbs. It’s a bit more effort, but it works just as well.
Definitely! While Oreos give a classic chocolatey flavor, you can substitute with chocolate graham crackers or even gingerbread cookies for a nice seasonal twist.
Yes! Use gluten-free cookies for the crust (there are some great Oreo-style options nowadays), and be sure to check that your pudding mix and whipped topping are also labeled gluten-free.
Final Thoughts
This Candy Cane No-Bake Delight Recipe feels like a little winter hug on a plate. It’s festive without complicating your holiday schedule and always earns rave reviews. I can’t wait for you to try it—serving it once will have you coming back every year, just like me.
Print
Candy Cane No-Bake Delight Recipe
- Prep Time: 15 minutes
- Cook Time: 0 minutes
- Total Time: 4 hours 15 minutes
- Yield: 12 servings
- Category: Dessert
- Method: No-Cook
- Cuisine: American
Description
Candy Cane Lush is a festive no-bake dessert featuring layers of Oreo crust, creamy white chocolate pudding, peppermint-flavored cream cheese mixture, and crushed candy canes. Perfect for holiday gatherings, this luscious treat combines crunchy textures with smooth, fluffy layers for a delightful seasonal indulgence.
Ingredients
Crust
- 36 Oreo cookies (14 oz package)
- ¼ cup unsalted butter, melted
- ¼ teaspoon salt
Cream Cheese Layer
- 1 (8 oz) package cream cheese, softened
- ½ cup powdered sugar
- 2 tablespoons milk
- 1 cup whipped topping, thawed
- ½ cup crushed candy canes
Pudding Layer
- 2 (3.3 oz each) packages white chocolate pudding mix
- 2 ¾ cups cold milk
Topping
- Remaining 11 oz whipped topping, thawed (from 12 oz carton)
- Remaining crushed candy canes (approximately ¼ cup)
Instructions
- Prepare Crust: In a food processor, pulse the Oreo cookies until they become fine crumbs. Add the salt and melted butter, then pulse just until combined. Press this mixture firmly into the bottom of a 9x13-inch baking dish. Chill the crust while preparing the other layers.
- Make Cream Cheese Layer: In a medium bowl, beat the softened cream cheese with an electric mixer until smooth. Add powdered sugar and milk, and continue beating until the mixture is smooth and creamy, about 2 minutes. Fold in 1 cup of whipped topping along with ½ cup crushed candy canes. Spread this mixture evenly over the chilled crust.
- Prepare Pudding Layer: In a clean bowl, whisk together the white chocolate pudding mix and cold milk vigorously for 2 minutes until the pudding thickens. Spread the pudding evenly over the cream cheese layer.
- Add Whipped Topping: Spread the remaining whipped topping over the pudding layer smoothly to cover it entirely. Cover the dish with plastic wrap or foil and chill in the refrigerator for at least 4 hours to allow the layers to set properly.
- Garnish and Serve: Just before serving, sprinkle the remaining crushed candy canes over the top for a festive, crunchy finish. Serve chilled and enjoy this delightful holiday dessert.
Notes
- This dessert is a no-bake treat that is easy to assemble and perfect for holiday celebrations.
- For a smoother crust, process Oreo cookies finely but avoid over-processing to maintain some texture.
- If candy canes are not available, crushed peppermint candies or peppermint bark can be a good substitute.
- Ensure the cream cheese is softened to room temperature for easier mixing and a smoother cream cheese layer.
- The dessert can be prepared up to 1 day in advance and stored covered in the refrigerator.
Nutrition
- Serving Size: 1 slice (1/12 of recipe)
- Calories: 320 kcal
- Sugar: 28 g
- Sodium: 210 mg
- Fat: 18 g
- Saturated Fat: 9 g
- Unsaturated Fat: 7 g
- Trans Fat: 0 g
- Carbohydrates: 38 g
- Fiber: 1 g
- Protein: 3 g
- Cholesterol: 40 mg


Leave a Reply